
User guide · updated 16 November 2026
Scandallo, explained step by step
You take a photo of your supplier's invoice and Scandallo saves the price of every product. With those prices it works out what each dish and each drink really costs you, tells you what to charge for them and warns you about money you're losing.
- For restaurants, bars, cafés, patisseries, bakeries and caterers.
- Works on your phone, tablet and computer.
- Nothing to download from an app store.
- The screenshots are from the real app, with sample data and every feature switched on. Depending on your plan, some may not appear.
Contents
- 1The idea in a minute
- 2Getting started
- 3Finding your way around
- 4Home: your business at a glance
- 5Invoices: from a photo to your prices
- 6Ingredients and suppliers
- 7Recipes: your recipe book
- 8Costings: what each dish costs you
- 9Drinks: the cost of every glass
- 10Allergens and a digital QR menu
- 11Sales
- 12Profitability, costs & staff
- 13Stock, shopping list and savings
- 14Your team: staff and permissions
- 15Your account, your data and plans
- 16Words worth knowing
- 17Frequently asked questions
Chapter 1
The idea in a minute
A costing (in Spanish, escandallo) works out what a dish costs you to make, ingredient by ingredient. Doing it by hand takes hours, and it's out of date as soon as a supplier changes a price. Scandallo does it with the prices from your own invoices.
- 1
You scan the invoice
A photo or PDF of your supplier's invoice. AI reads the products, quantities and prices, and you check them.
- 2
Every product gets its price
Price per kilo, litre or unit, with its date and supplier, without typing a thing.
- 3
You write up your recipes
Ingredients and quantities. The app works out the cost of each portion using your latest prices.
- 4
You decide with real numbers
What to charge for each dish, which ones are losing money and where you could buy for less.
Chapter 2
Getting started
Creating your account and getting it ready takes a few minutes. No card needed: your account starts on the Free plan.
Create your account
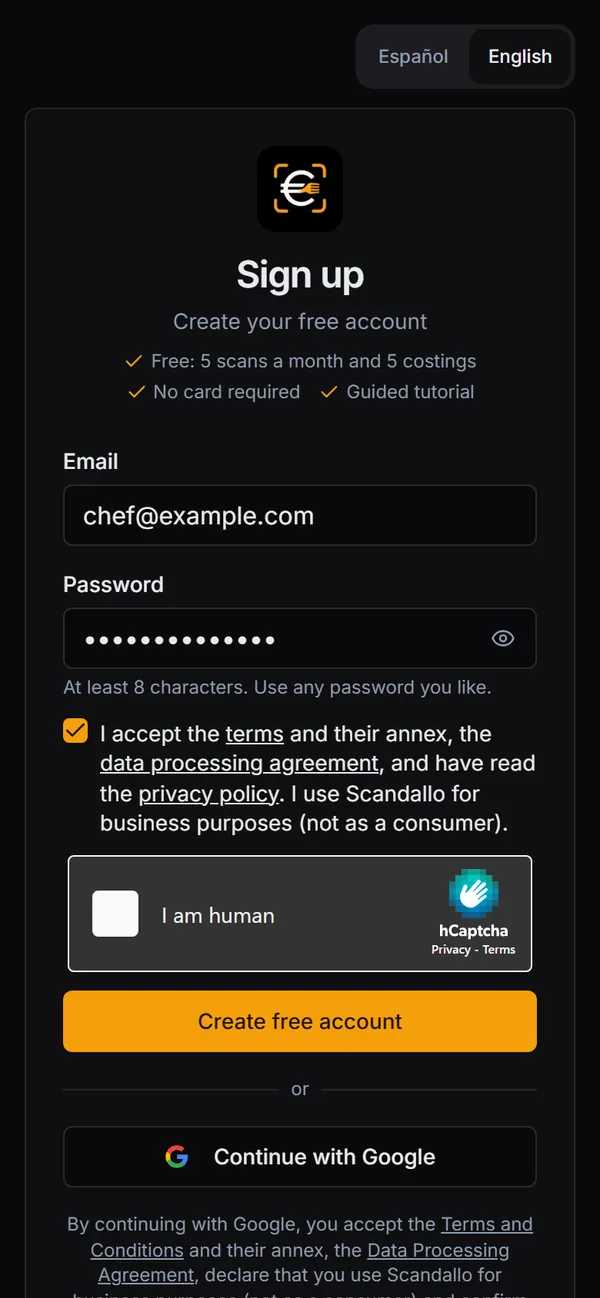
- Go to scandallo.com/en and tap Start for free.
- Enter your email and a password of at least 8 characters.
- Tick the box to accept the terms and the privacy policy, and the I am human check.
- Tap Create free account. You'll get an email, “Confirm your account”: tap Confirm my account.
You can also sign in with your Google account using Continue with Google (tick the terms box first).
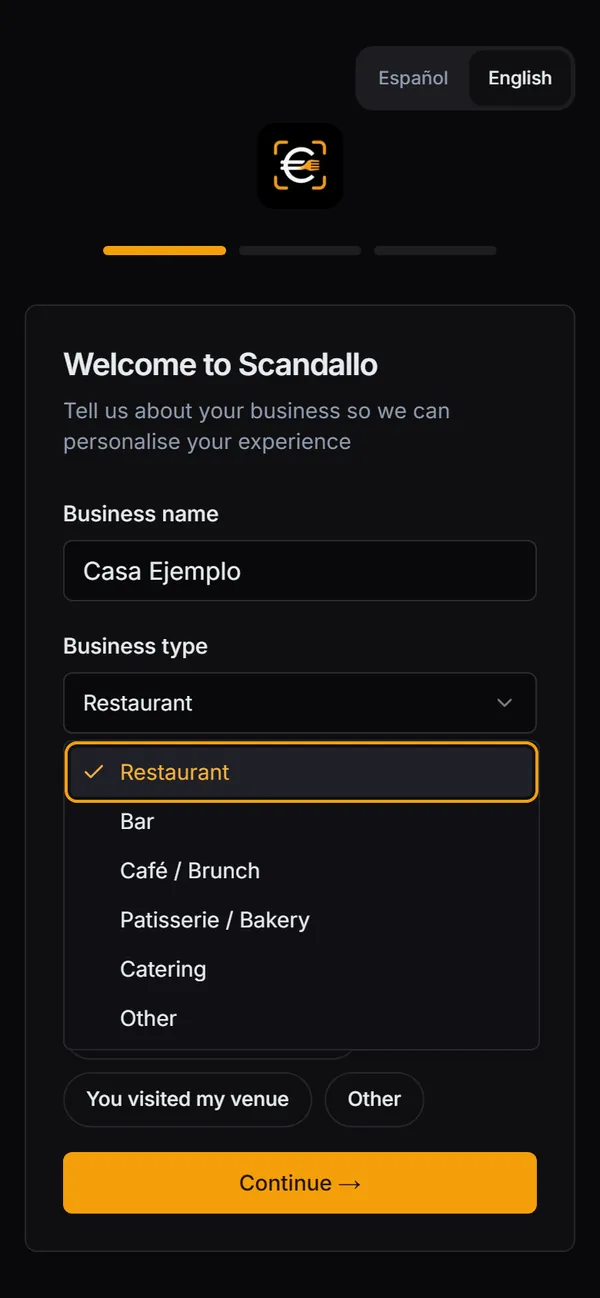
Tell the app your business name
Once you've confirmed your account, a short setup assistant opens. It asks for your business name and type: Restaurant, Bar, Café / Brunch, Patisserie / Bakery, Catering or Other. If you like, it also asks how you heard about us. Then it invites you to upload your first invoice or skip that step; if you skip it, it gives you a few tips to get started.
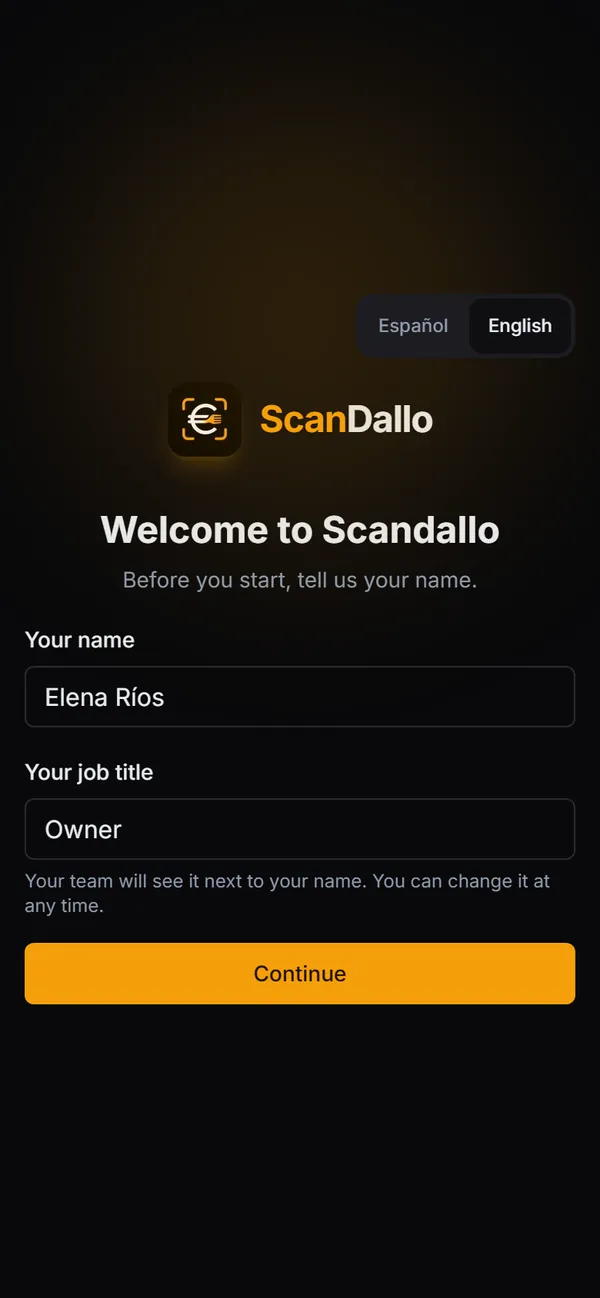
Tell us your name
The first time you log in, the app asks for your name and your job title (for example, Owner, General manager or Head chef). It uses your name to greet you every time you open the app, and if you ever work with your team, it's what they'll see next to what you do. You can change your name whenever you like in Settings → Profile → Your name.
A tutorial that walks you through it
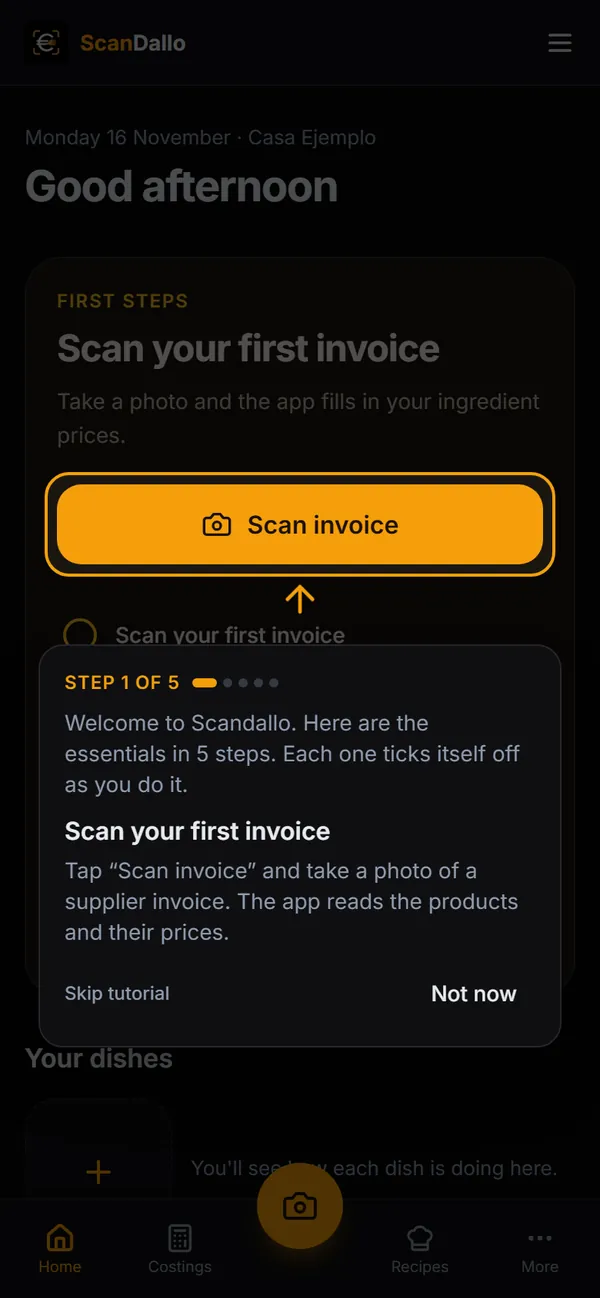
The first time you log in, the app guides you through five steps: scan your first invoice, create your first recipe, cost it, review the allergens and turn on your QR menu. On each screen it dims everything except the button you need to tap, with an arrow, and each step ticks itself off when you do it.
You can put it aside for a while with Not now or leave it with Skip tutorial. To go through it again: More → Replay tutorial (on a computer, Settings → Preferences). If you open another venue, it doesn't appear again.
Keep it on your phone's home screen
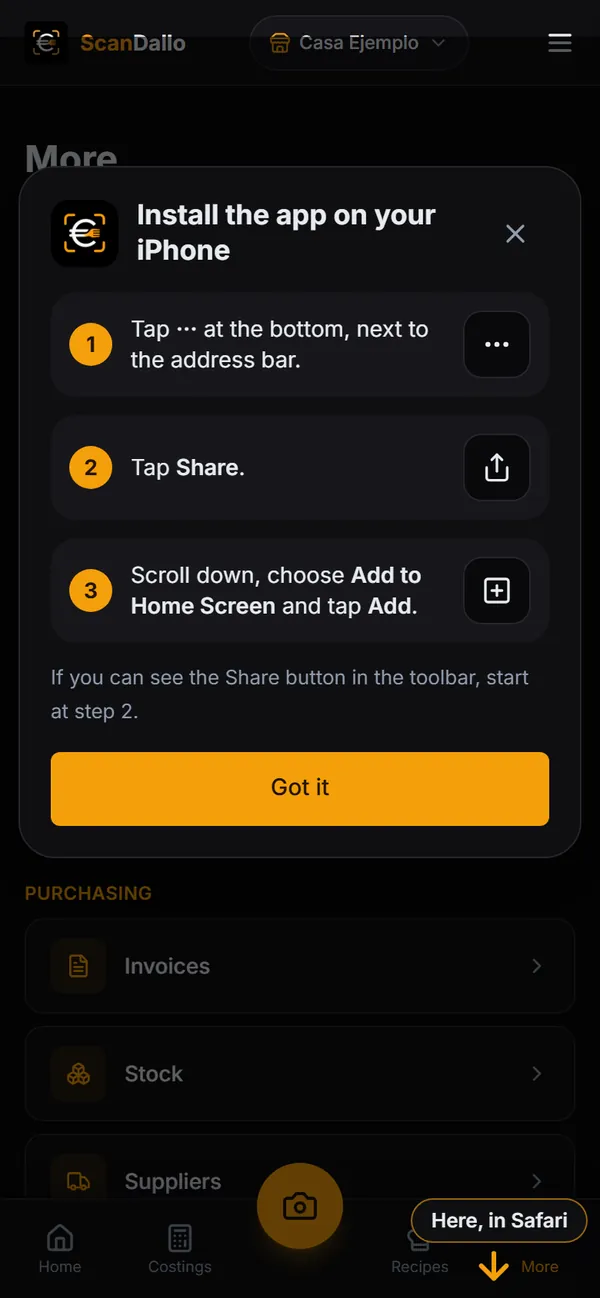
Scandallo works in your browser, but you can install it without going through an app store: it opens with one tap from your home screen, without the browser bar, like any other app.
- Android: More → Install the app and confirm. If you press and hold the icon, you get shortcuts to scan an invoice, open your costings or open your shopping list.
- iPhone: More → Install the app and follow the steps it shows you (in Safari: Share → Add to Home Screen).
- From a computer: on Home, the Get it on your phone card has a code you can scan with your phone's camera, or it emails you the link. It's also at scandallo.com/en/install.
After you save a costing or an invoice on your phone, the app suggests it once. If you open it from Instagram or TikTok, it explains how to switch to Safari or Chrome so you can install it.
Chapter 3
Finding your way around
On a phone, everything is within reach of your thumb; on a computer, all the sections are on the left.
When you open the app
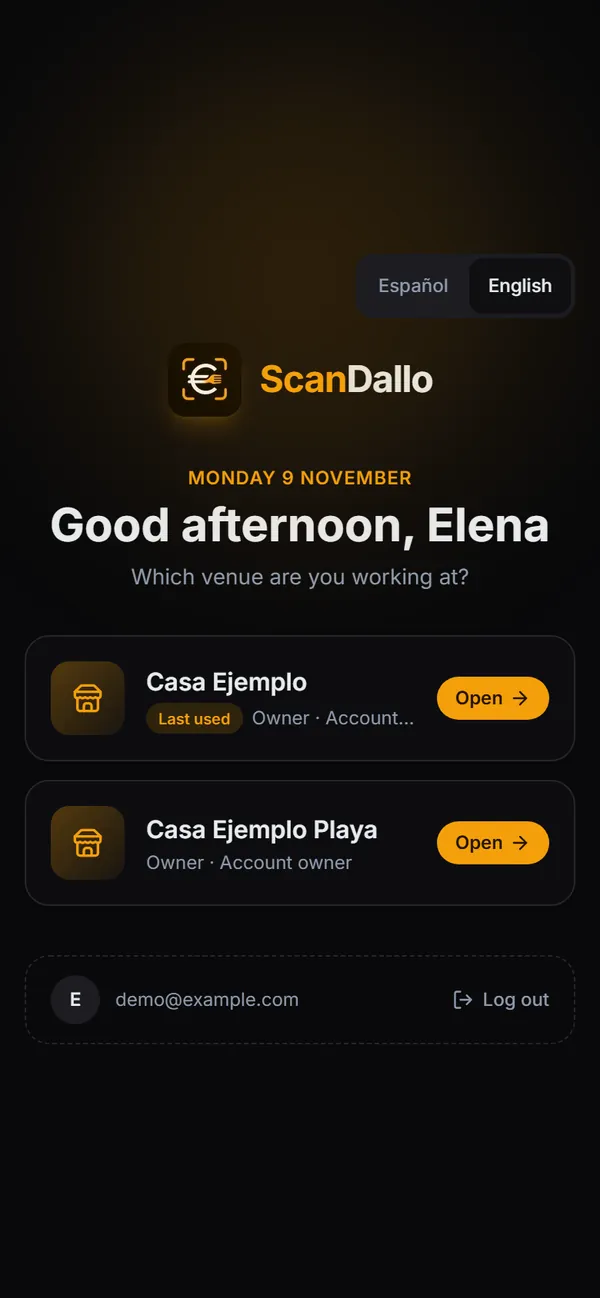
Every time you open the app, it greets you by name and shows your venues. You choose which one you're working at with Open, even if you only have one. If you work at several (your own and any you've been invited to), they all appear, with your job title at each. A venue you've asked to join that hasn't accepted you yet appears separately, marked “Request sent”.
Then you go to that venue's Home screen. Once inside, the venue you're in is always shown at the top; if you have several, tap it to switch between them.
On a phone
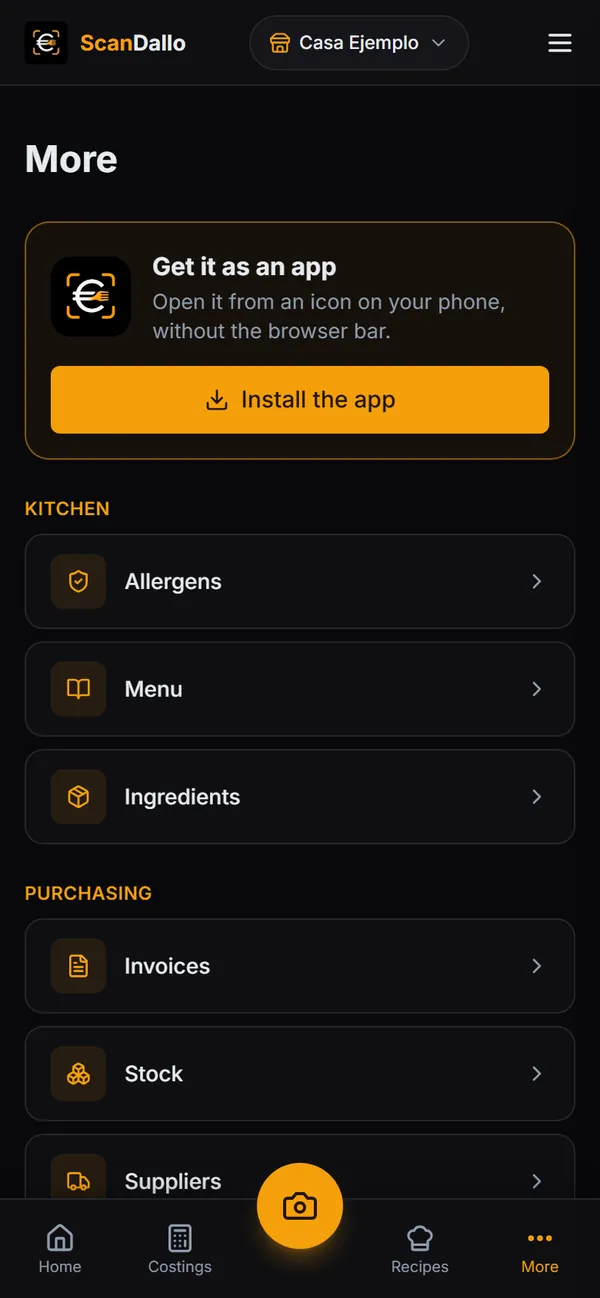
- At the bottom you have Home, Costings, an orange camera button to scan an invoice from any screen, Recipes and More.
- More arranges everything else the way someone in hospitality thinks: Kitchen (Allergens, Menu, Ingredients), Purchasing (Invoices, Stock, Suppliers, Shopping list), Team (Team, Team activity), Money (Sales, Profitability, Costs & staff, Savings) and Account (My account & settings, Help & contact). At the end there's Replay tutorial. At the very top, until you've installed the app on that phone, there's the Get it as an app card with Install the app.
- At the top right, the menu button (three lines) opens the list of sections, settings and Log out.
Chapter 4
Home: your business at a glance
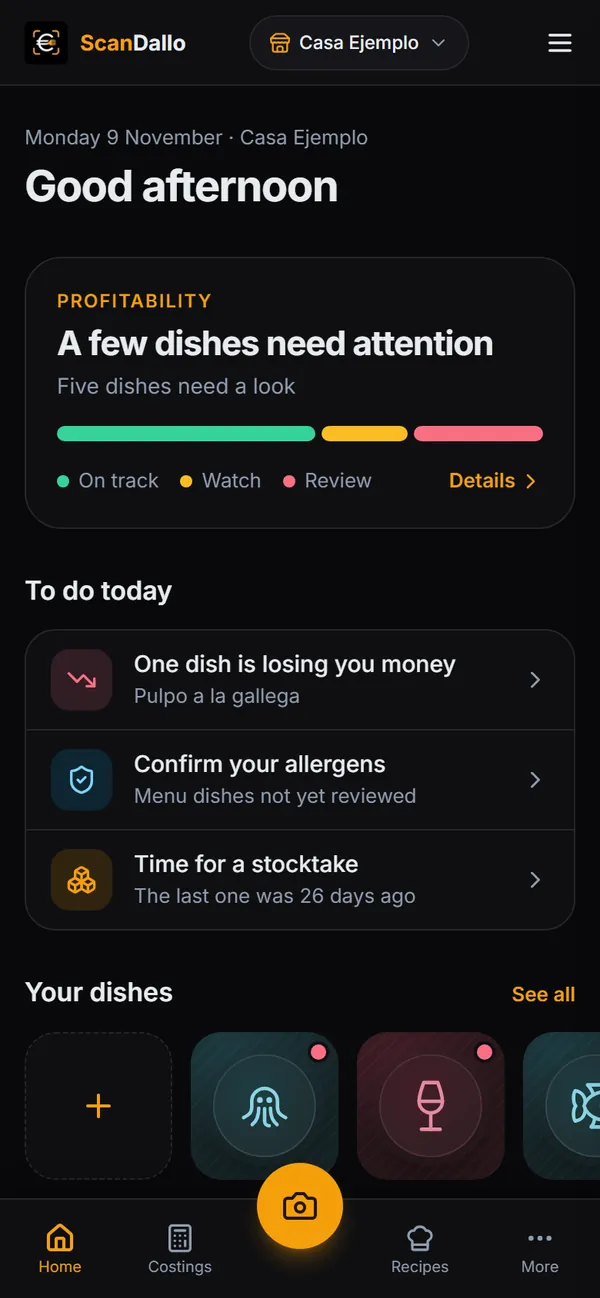
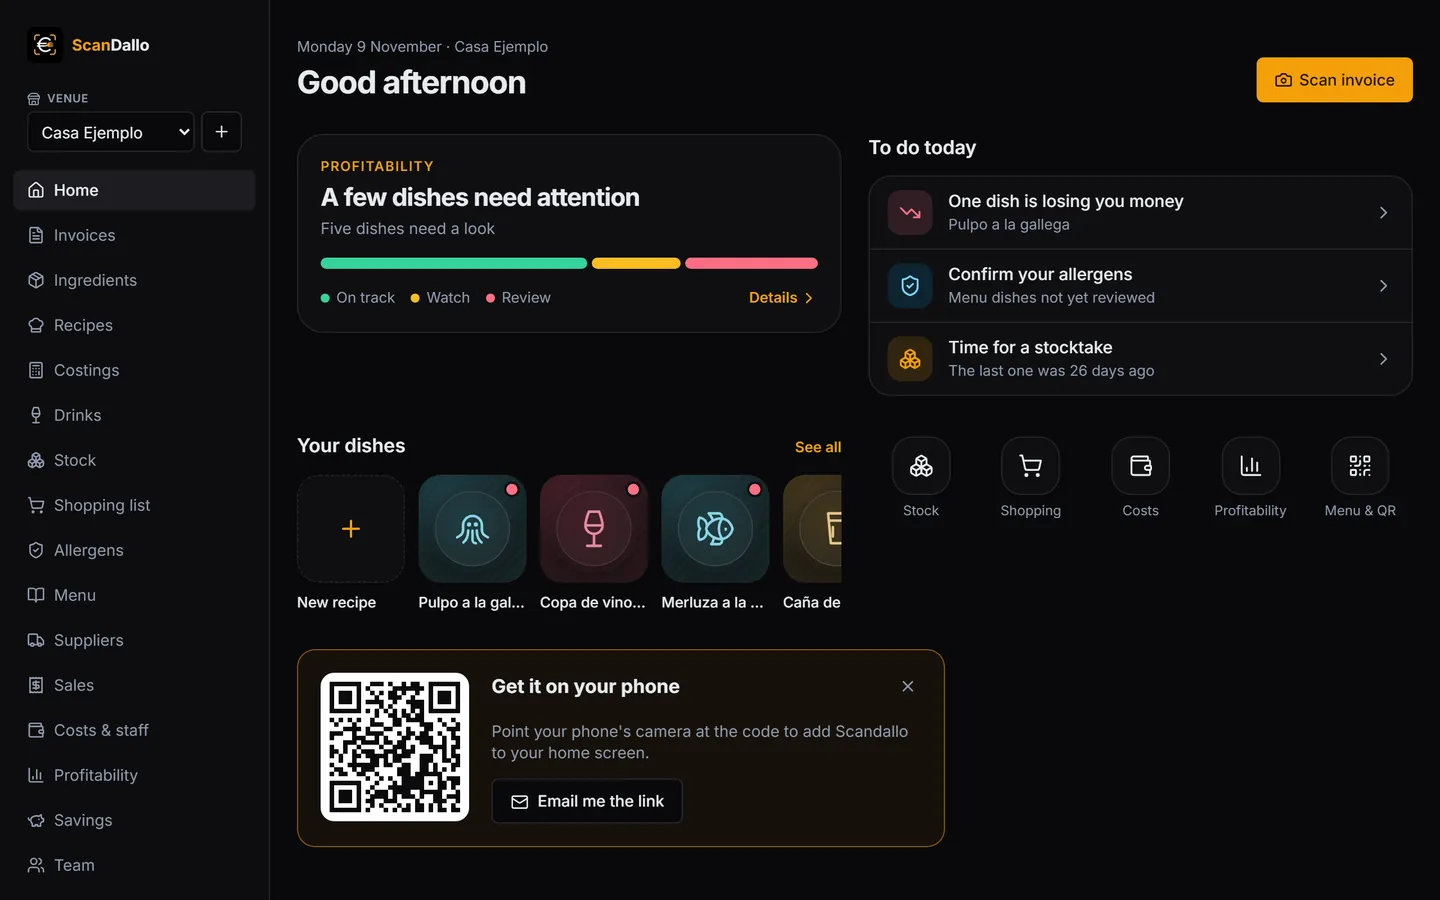
It's the first thing you see when you open the app. At a glance you know how your kitchen is doing, what you need to do today and how your dishes are doing, without figures: the numbers are in Profitability.
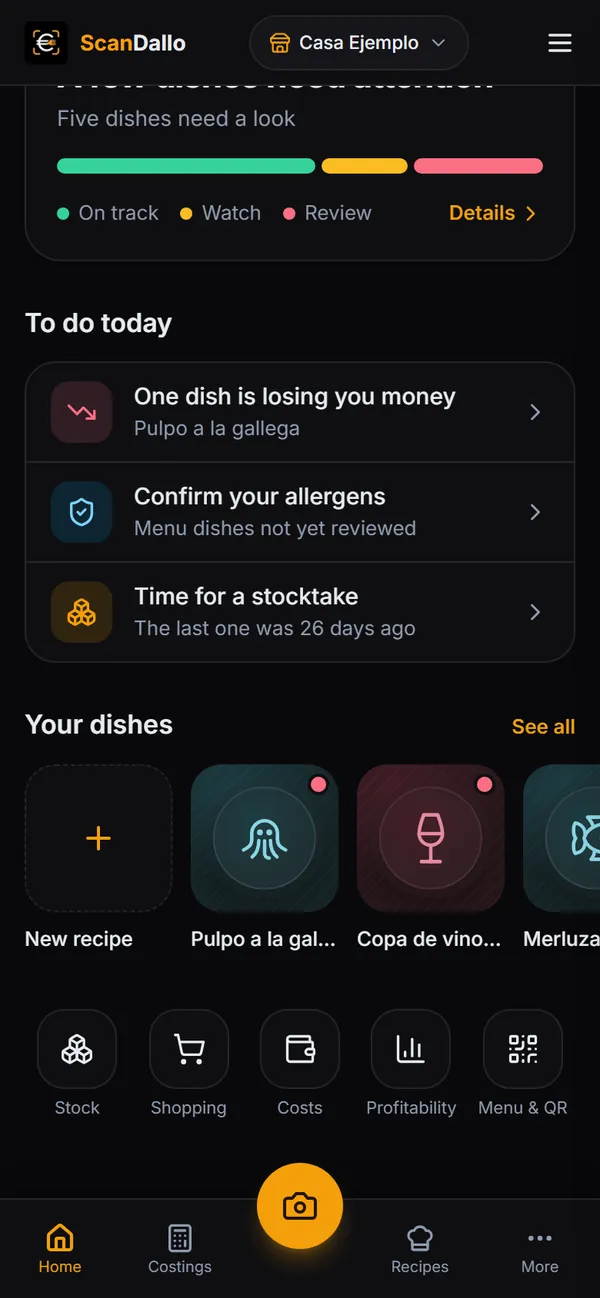
- How your kitchen is doing, in one sentence (“Your kitchen is doing well”, “A few dishes need attention”…) and a coloured bar with your dishes: green for the ones on track, amber for the ones to watch and red for the ones to review. Tap the card to see the details in Profitability.
- “To do today”: three things at most, the most important first: dishes losing you money, an invoice you left half-reviewed, prices that went up on your last invoice, dishes on the menu with unconfirmed allergens, your stock (if your last stocktake was a week ago, or products it's time to order), new dishes not yet published, ingredients where you could save, or dishes without a selling price. If there's nothing to do, it doesn't appear.
- First steps: when your account is new, instead of how your kitchen is doing you see the next step in large type, with its button, and the five tutorial steps in order: scan your first invoice, create your first recipe, cost it, review the allergens and turn on your QR menu. Each step ticks itself off when you do it.
- If you work with your team (chapter 14), it tells you at the top who wants to join and which invoices have been uploaded for you to review. And if you're running low on scans or costings in your plan, a line tells you.
- “Your dishes”: photos of your dishes, the one doing worst first, each with a coloured dot (the same as in the bar). If a dish has no photo, it shows a drawing of what it is. The first tile, New recipe, is for creating a dish.
- Shortcuts to Stock, Shopping, Costs, Profitability and Menu & QR.
- To scan an invoice, use the orange camera button on the bottom bar (on a computer, Scan invoice at the top right).
Chapter 5
Invoices: from a photo to your prices
This is the heart of the app. Every invoice you scan brings your product prices, your costings and your stock up to date.
1. Choose how you'll scan
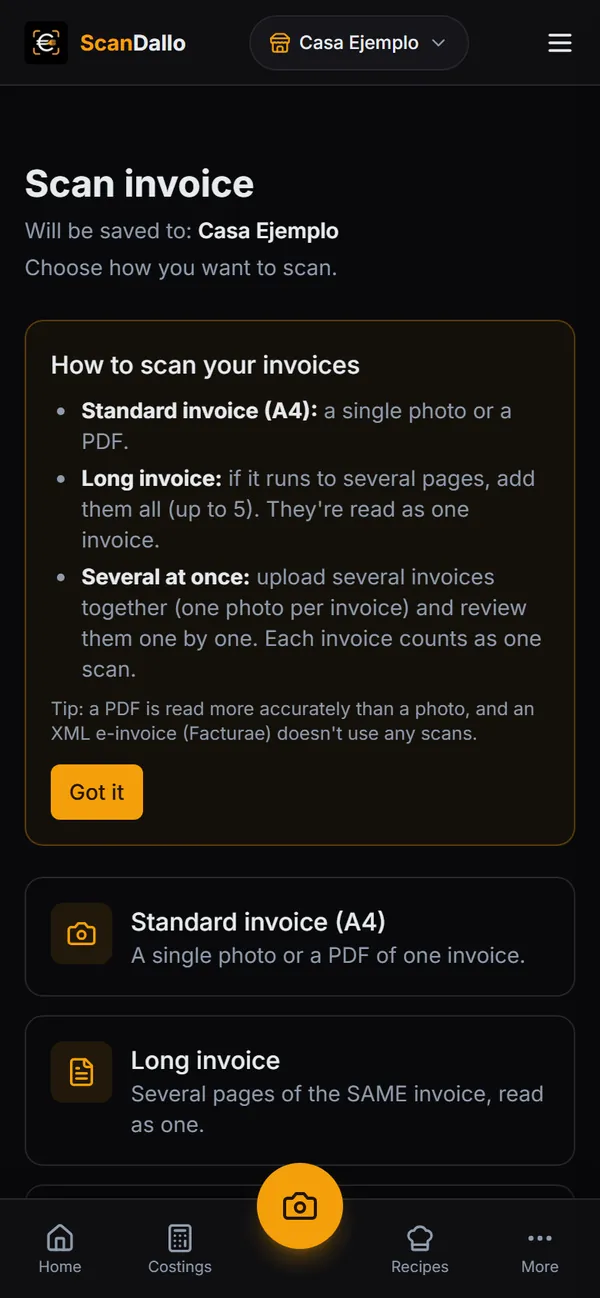
Tap the orange camera button (on a computer, Scan invoice on Home or + New invoice in Invoices) and choose:
- Standard invoice (A4): a single photo or a PDF.
- Long invoice: the same invoice over several pages (up to 5). They're read as one and count as a single scan.
- Several invoices at once: up to 10 different invoices, one photo per invoice. You review them one by one with Save and next. Each invoice counts as one scan.
2. Take the photo or upload the file
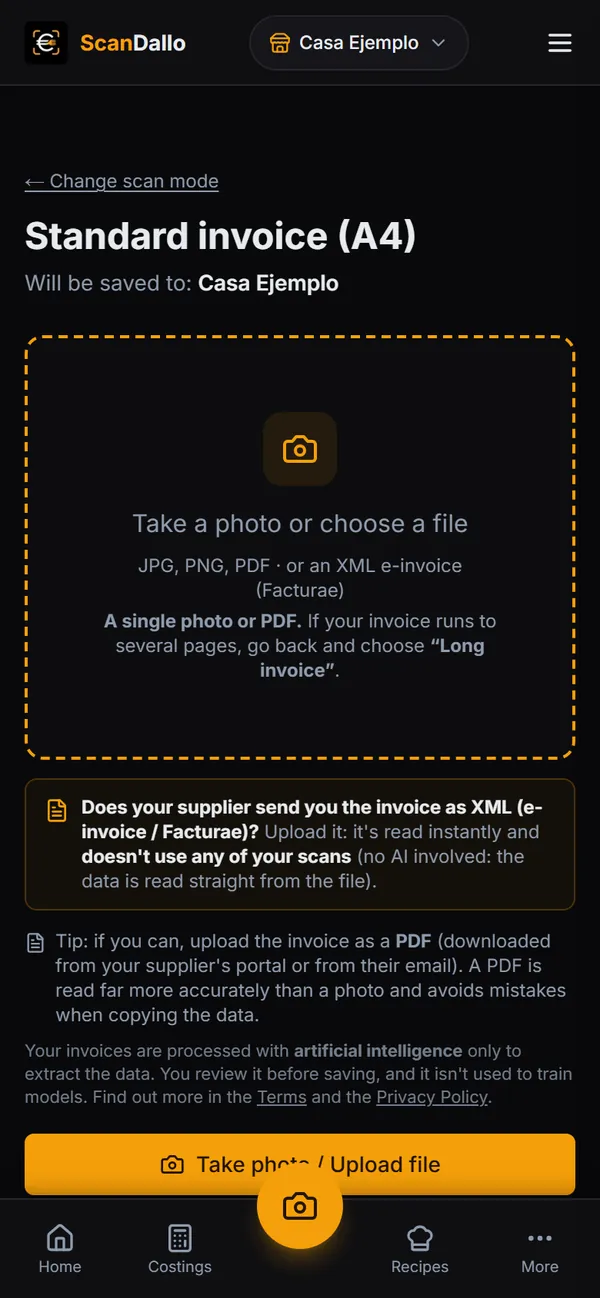
Tap Take photo / Upload file: your phone lets you use the camera, the gallery or a file. On a computer you can also drag it in. JPG, PNG and WEBP photos are accepted (the app shrinks them for you), as are PDFs up to 3 MB. Before reading, the app shows you the pages so you can check they're the right ones, and warns you if a photo is too small or looks blurry.
Tap Scan invoice and in a few seconds you'll see what it has read.
3. Check what it has read
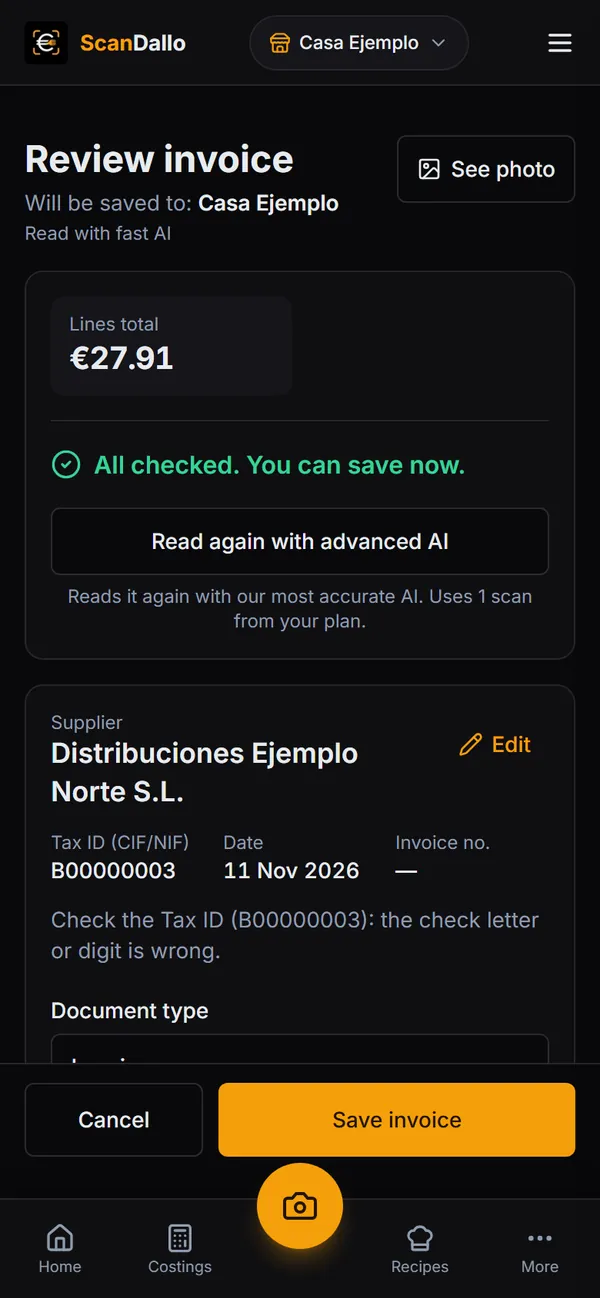
In Review invoice the first thing you see is a summary: whether it matches the invoice (the lines total against the subtotal), the VAT, the total and how many lines are left to check, with Go to the next one to go through them one by one. You have the photo alongside (on a phone, with See photo). Below, the supplier, the Tax ID, the date and the number; Edit lets you change them, and the subtotal, VAT and total too.
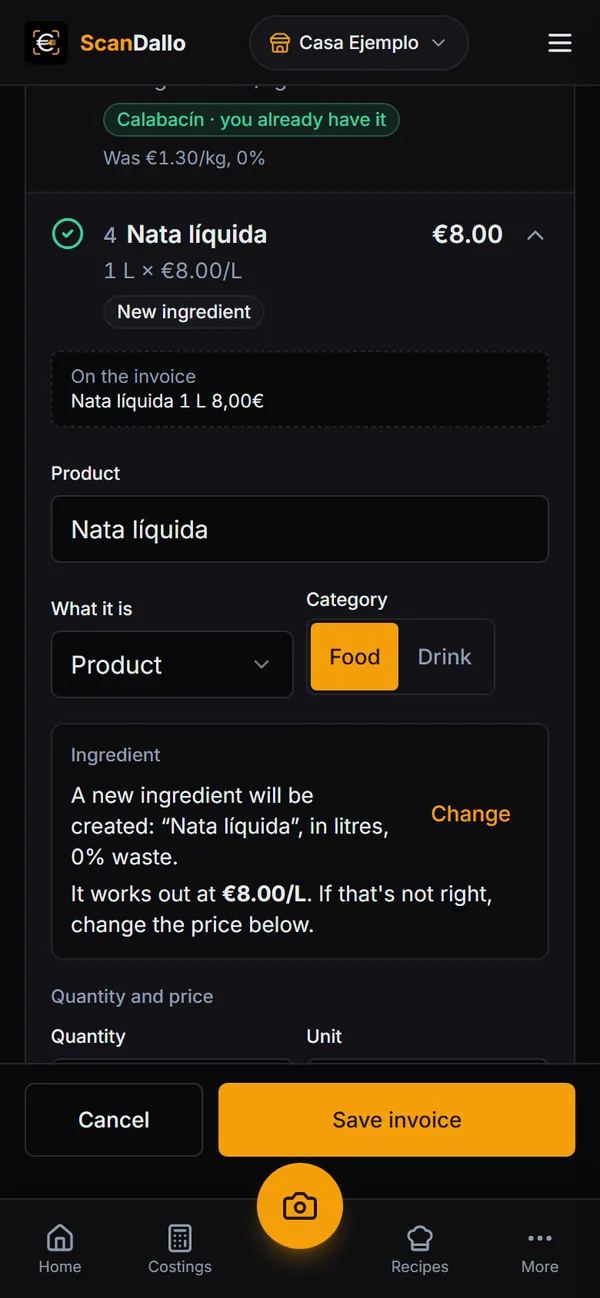
Each line is a short row: product, quantity × price, total and which ingredient it goes to. If the app isn't sure (a similar ingredient, how much a sack weighs, a total that doesn't match quantity × price), the line turns amber and asks you right there in the row, with buttons to answer without opening it. Tap a line to open it and correct everything: product, food or drink, ingredient, quantity, price and packs. Under What it is you flag lines that aren't a product (delivery charges, packaging or deposits, discounts, a free item, something that isn't food…): they're saved with their amount, without creating an ingredient. Remove any extra lines with Delete line and add missing ones with + Add line. To check shows only the lines with something to review. If you correct the price on a line that has a printed total, the quantity stays the same and the total changes; the app warns you it no longer matches what's printed, and Keep … takes you back to the invoice total. On a discount line, Spread across the prices takes it off each product in proportion to its amount.
Each line tells you which of your ingredients it goes to:
- “Tomate pera · you already have it”: it has recognised it.
- “Which ingredient is …?”: it isn't sure and gives you options.
- “New ingredient”: it's a product you didn't have yet; open the line to see the ingredient that will be created, with its unit and price.
Save invoice is always at the bottom, within reach. If something stops you saving (the date is missing, an impossible price…), it says so above the button and takes you to the line.
When you correct a match, the app remembers it for that supplier's future invoices. And if the supplier's name is very similar to one you already have (or has the same Tax ID), it asks “Is this a supplier you already have?” so you don't end up with a duplicate.
Under Document type you choose whether it's an invoice, a delivery note with no prices (adds to your stock without changing prices) or a credit note (takes what you returned off your stock). If you've already saved an invoice from the same supplier with the same number (or the same date and amount), it warns you before you save it again.
4. Save: everything else updates itself
When you tap Save invoice, Scandallo does the work for you:
- It records the supplier (or creates it if it's new) and creates the new ingredients.
- It records each product's price with the invoice date. The most recent price is the one your costings use.
- It adds the quantities you bought to your stock (in Stock).
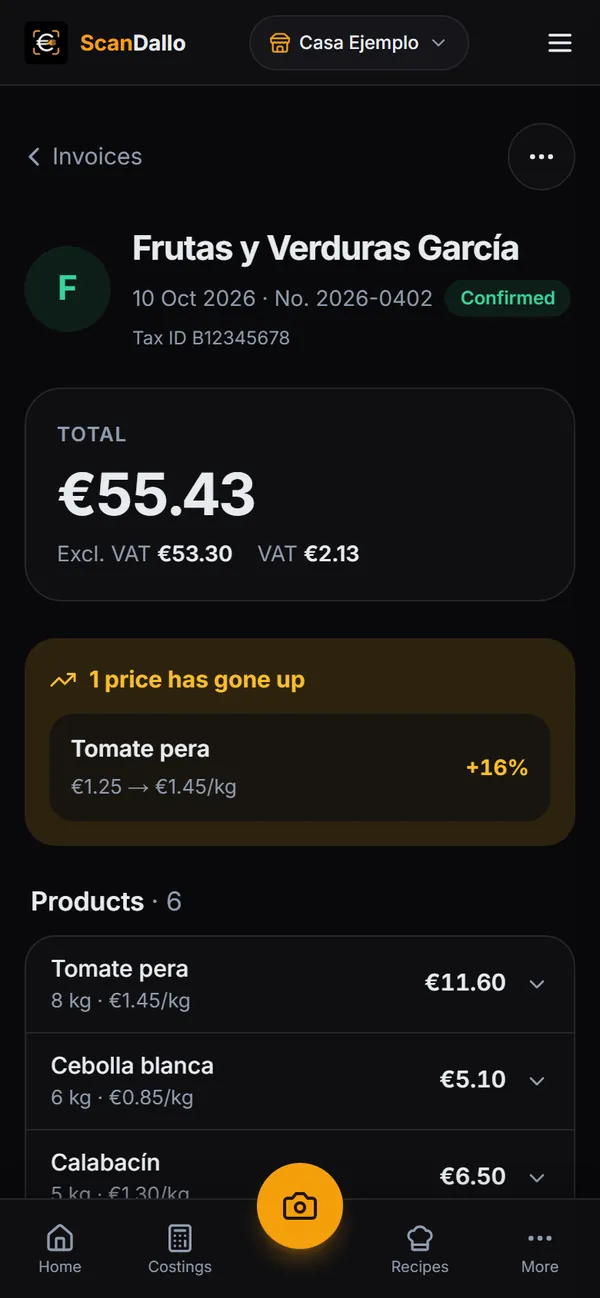
- On the saved invoice you can see which prices have gone up or down by 10% or more compared with your previous purchase. It also emails you Varies by plan (you can turn this off in Settings).
It's all or nothing: if one line fails, the invoice isn't saved, so it's never left half-done. Fix it and save again.
Your invoices, always to hand
- Invoices: all in one place, with search by supplier, invoice number or product, a date filter and sorting, as a list or a grid (with a thumbnail of each invoice). You can create folders (for example “Fishmonger” or “Drinks”) and move each invoice into its folder.
- Invoice page: the supplier, the date and the number; the total in large type, with the subtotal and VAT below (if the invoice showed them); the prices that have changed; each product with its quantity and its price per kilo, litre or unit, and View the original invoice (if you uploaded a PDF, the PDF opens). Under the … button: Edit details (supplier, date or number; its prices follow), Share with another venue, Move to a folder and Download as PDF.
- Deleting: a single line (tap the product and Remove line) or the whole invoice (… → Delete invoice). When you delete an invoice, you choose whether to remove the stock it added.
- To review: if you work with your team, the invoices they upload when an order arrives appear at the top for you to review (chapter 14).
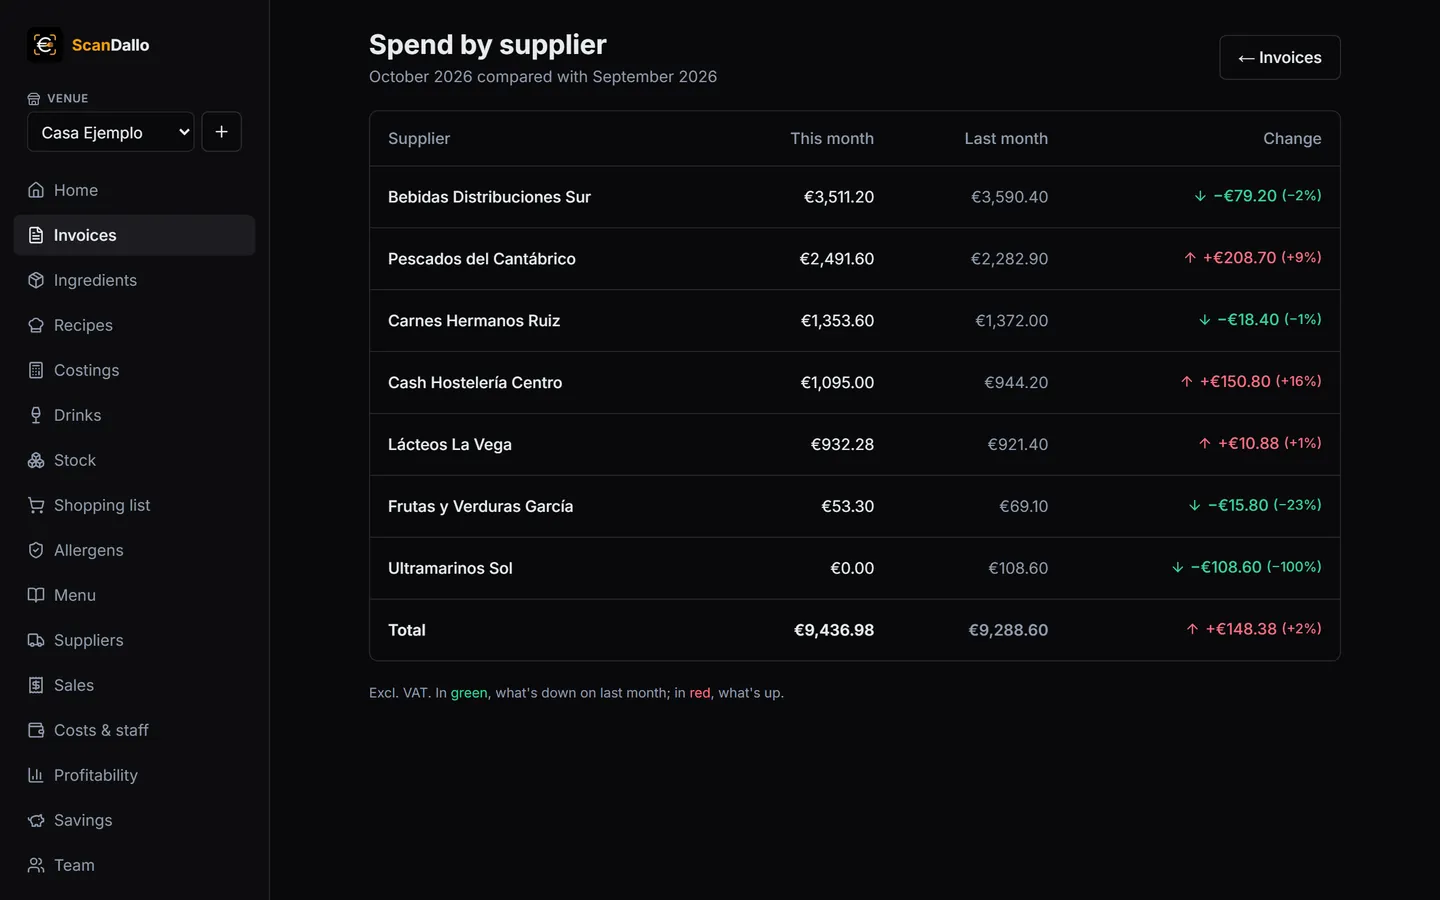
- Spend by supplier: how much you've spent with each supplier this month compared with last month, in green if you're spending less and in red if more.
- Export: in Invoices → Export you choose the period (this quarter, last quarter, the year…) and download an Excel sheet (or CSV, for accounting software). The purchase ledger (one row per invoice: date, supplier, Tax ID, number of products and amount excl. VAT) is on every plan. Also Varies by plan: the ledger for your accountant (invoice no., Tax ID, subtotal, VAT and total, with totals), the breakdown by product and the price history.
Chapter 6
Ingredients and suppliers
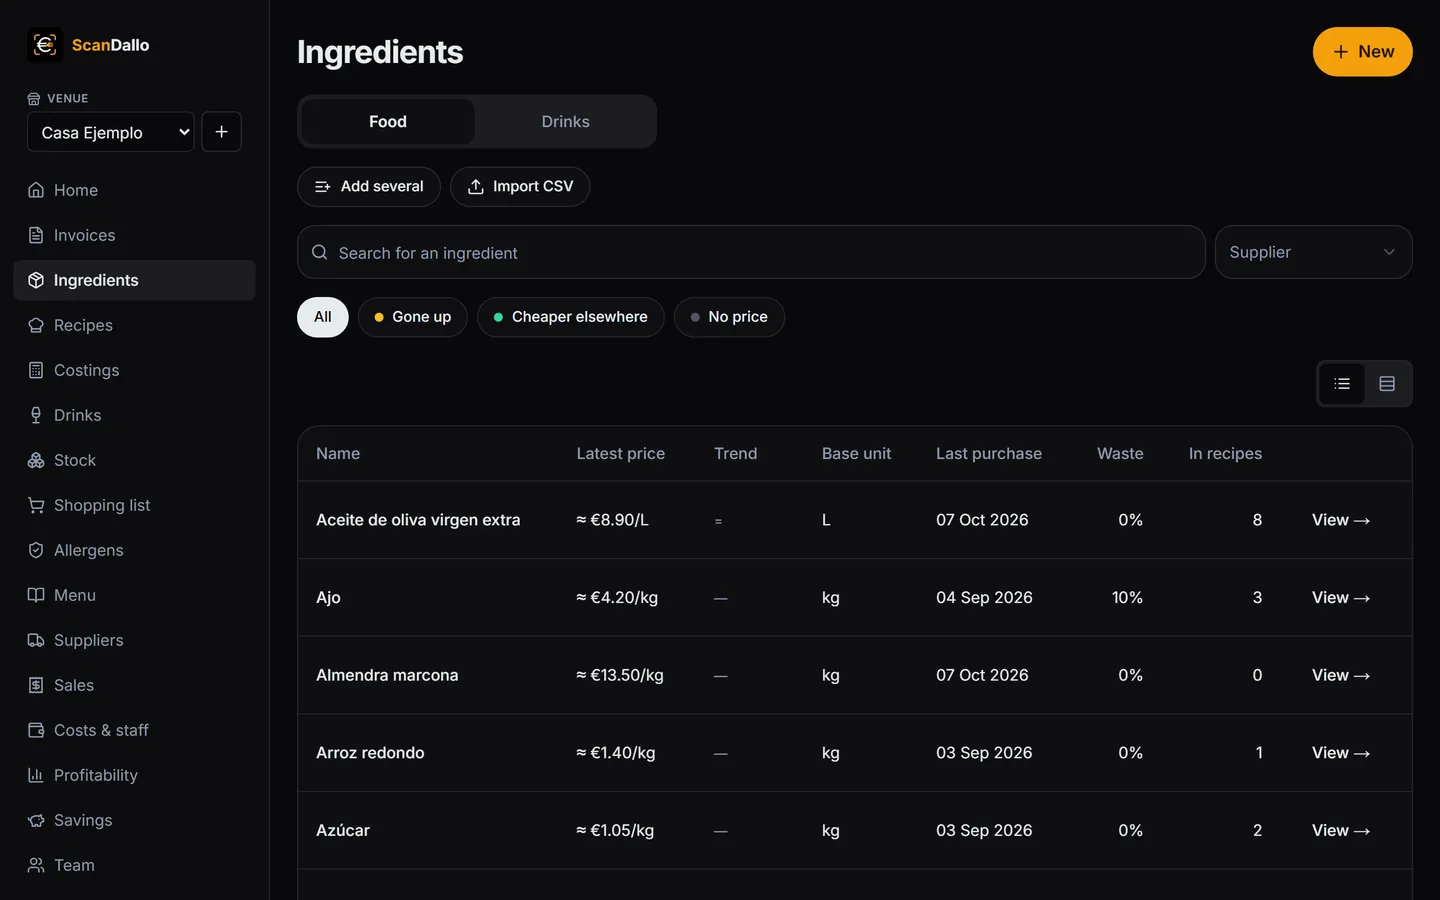
Your pantry, with prices. It fills itself from your invoices, in the Food and Drinks tabs, with filters to see what has gone up, what's cheaper from another supplier and what has no price.
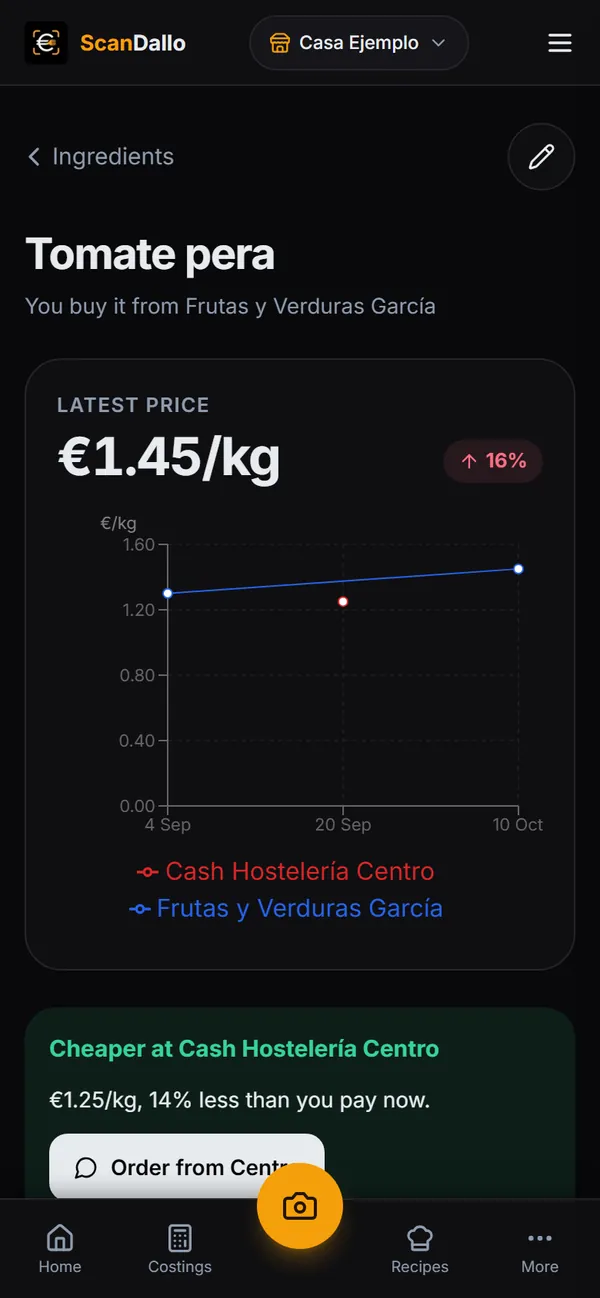
Each ingredient's page
- Latest price in large type and, in the Product group, what it's measured in, the pack and the trimming waste Varies by plan (tap them to change them). The pencil at the top opens Edit ingredient (name, unit, usual supplier).
- Suppliers: if you've bought it from two or more, you see each one's latest price, which is the cheapest and which is the one you use. If you're buying from the more expensive one, “Cheaper at …” appears at the top, with what you'd save and Order from ….
- Price history as a chart, and a trend arrow showing whether it's going up or down Varies by plan.
- Purchases (from invoices, each with a link, and any prices you've entered by hand) and where it's used, with what it costs in each recipe.
- The ingredient's allergens (covered in chapter 10).
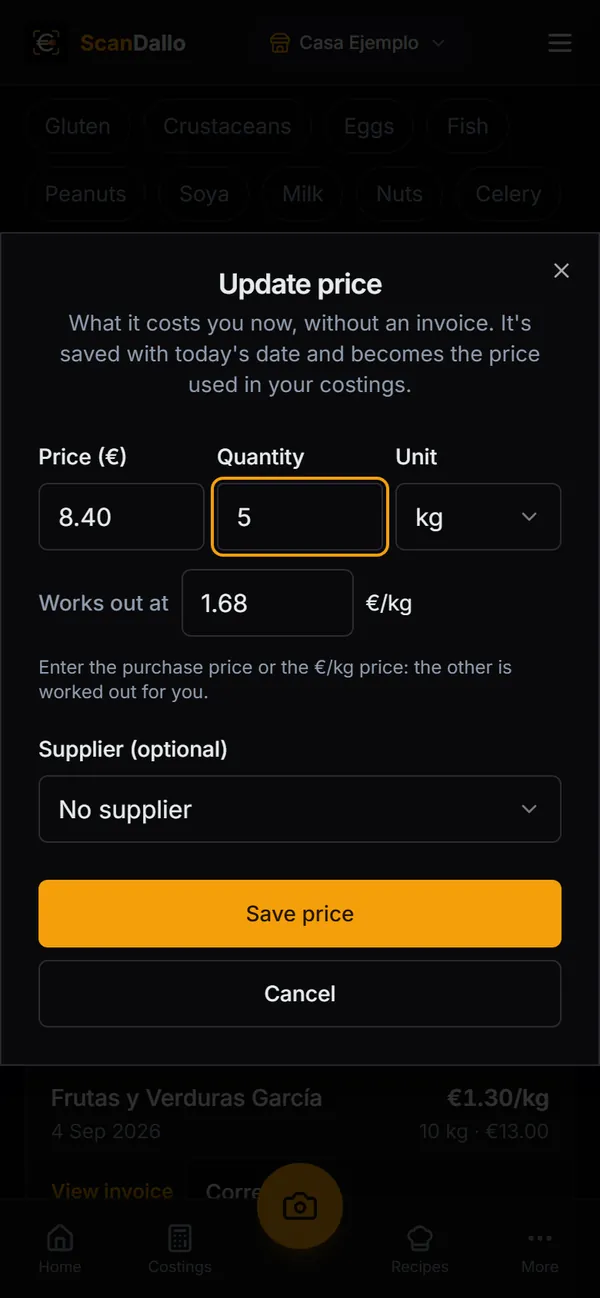
Price changed without an invoice?
On the ingredient's page, tap Set price (or Update price), enter what you pay, for what quantity and in what unit (for example €8.40 for 5 kg) and, if you like, the supplier. Under “Works out at” you'll see €1.68/kg; you can also type the price per kilo straight in there and the app works out the rest. Tap Save price: it's saved with today's date and becomes the price your costings use, without touching your invoices. If you make a mistake, you can delete a price entered by hand.
You can also create ingredients by hand with + New (with Create and add another you carry on with the next one), several at once with Add several, or all in one go from a spreadsheet with Import CSV. You can do this from your phone too. The price you enter when you create one shows as “provisional”: the first invoice for that product replaces it.
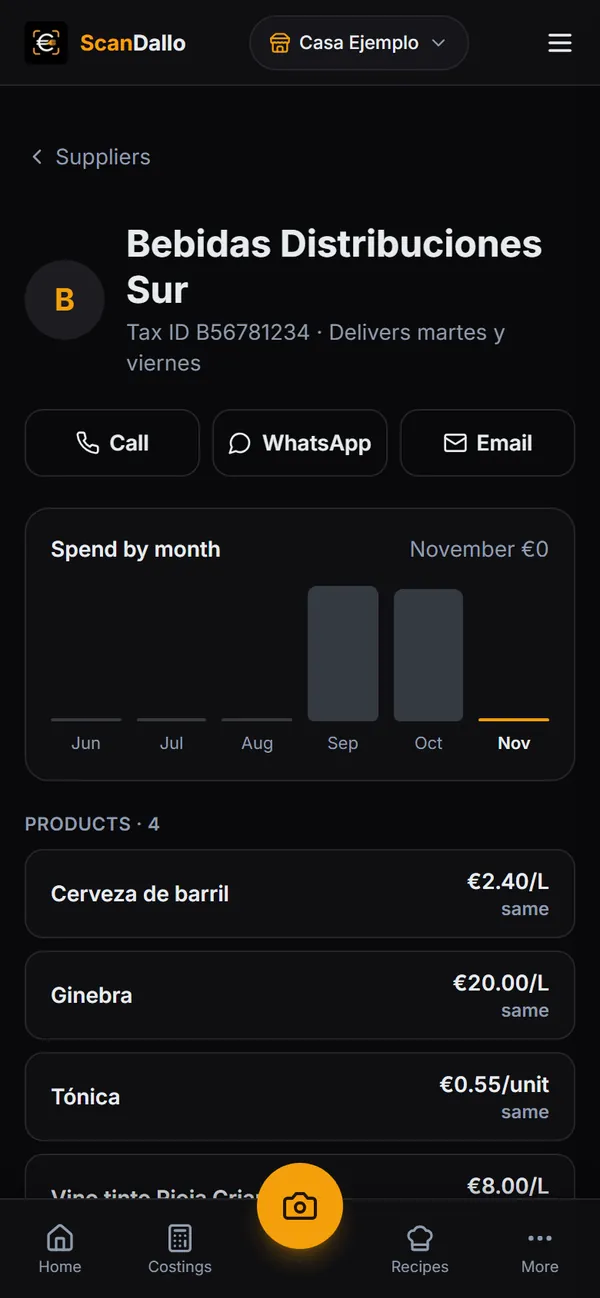
Suppliers
Suppliers are created automatically when you save invoices. In the list you see how much you've spent with each one this month, when their last invoice was, and a warning if they've raised prices or someone else sells you something cheaper.
On a supplier's page you have the spend for the last 6 months, their products with the latest price and how much it has changed, and their invoices. With Edit details you add their phone, email and delivery days; then you can call or message them with one tap, and Place order prepares a WhatsApp message with what you need according to your shopping list (the message is in Spanish, since your supplier is in Spain).
Chapter 7
Recipes: your recipe book
In Recipes you write down your dishes the way you make them. What they cost is in Costings: it's the same dish seen two ways.
- Recipes is your recipe book: ingredients, quantities, method and photo. For food dishes, neither the cost nor the margin is shown here. At the top you choose Food or Drinks.
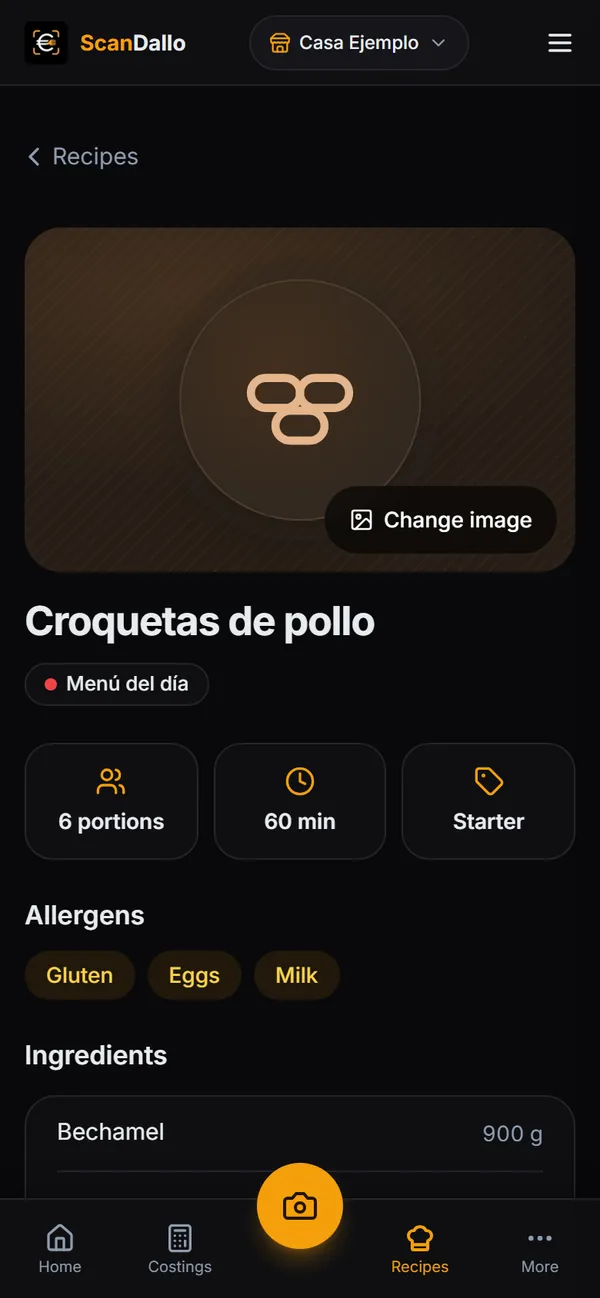
- When you open a recipe you see its page: portions, time and type, allergens, ingredients and steps. View costing takes you to what it costs and Edit opens the editor (ingredients, photo, colour, method, the dish's allergens…).
- The dish's image: with no photo, it shows a drawing of what it is, based on its name (octopus, paella, cake, small beer…). With Change image on its page, you choose another drawing from more than 80 or upload your own photo. You can also do it from Edit.
- Costings is the same recipe with the money: cost per portion, margin and suggested price. If you change the recipe, its costing is recalculated.
- Recipes are unlimited. A recipe moves into Costings when you tap Cost this dish on the recipe itself: that uses one of the active costings in your plan Varies by plan. If you no longer need it, the costing has Remove costing (the recipe isn't deleted). Drinks are in the Drinks tab, both here and in Costings, and they start out as costings, because their page works out the cost per glass.
Each recipe has a status label (on a phone it only shows when something's missing):
- Ready: all its ingredients are linked to your products.
- Not linked: it has an ingredient typed by hand that you haven't linked to your products yet.
- Missing recipe: it has no ingredients yet (for example, a dish that came from your till).
As a grid or a list, and with colours
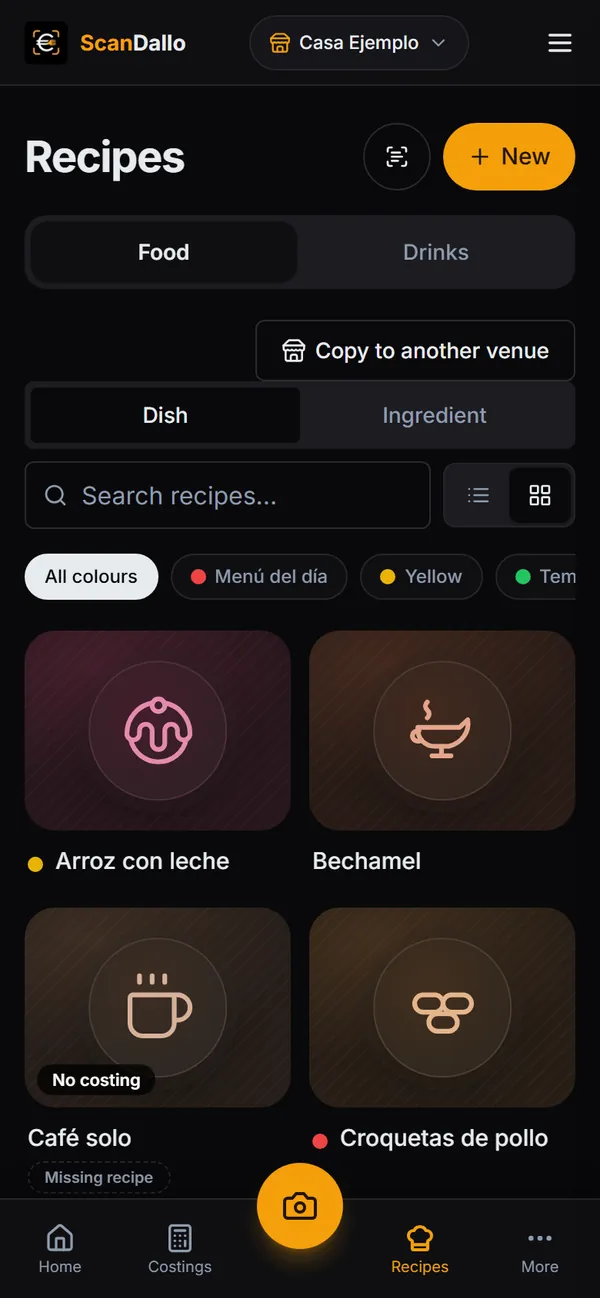
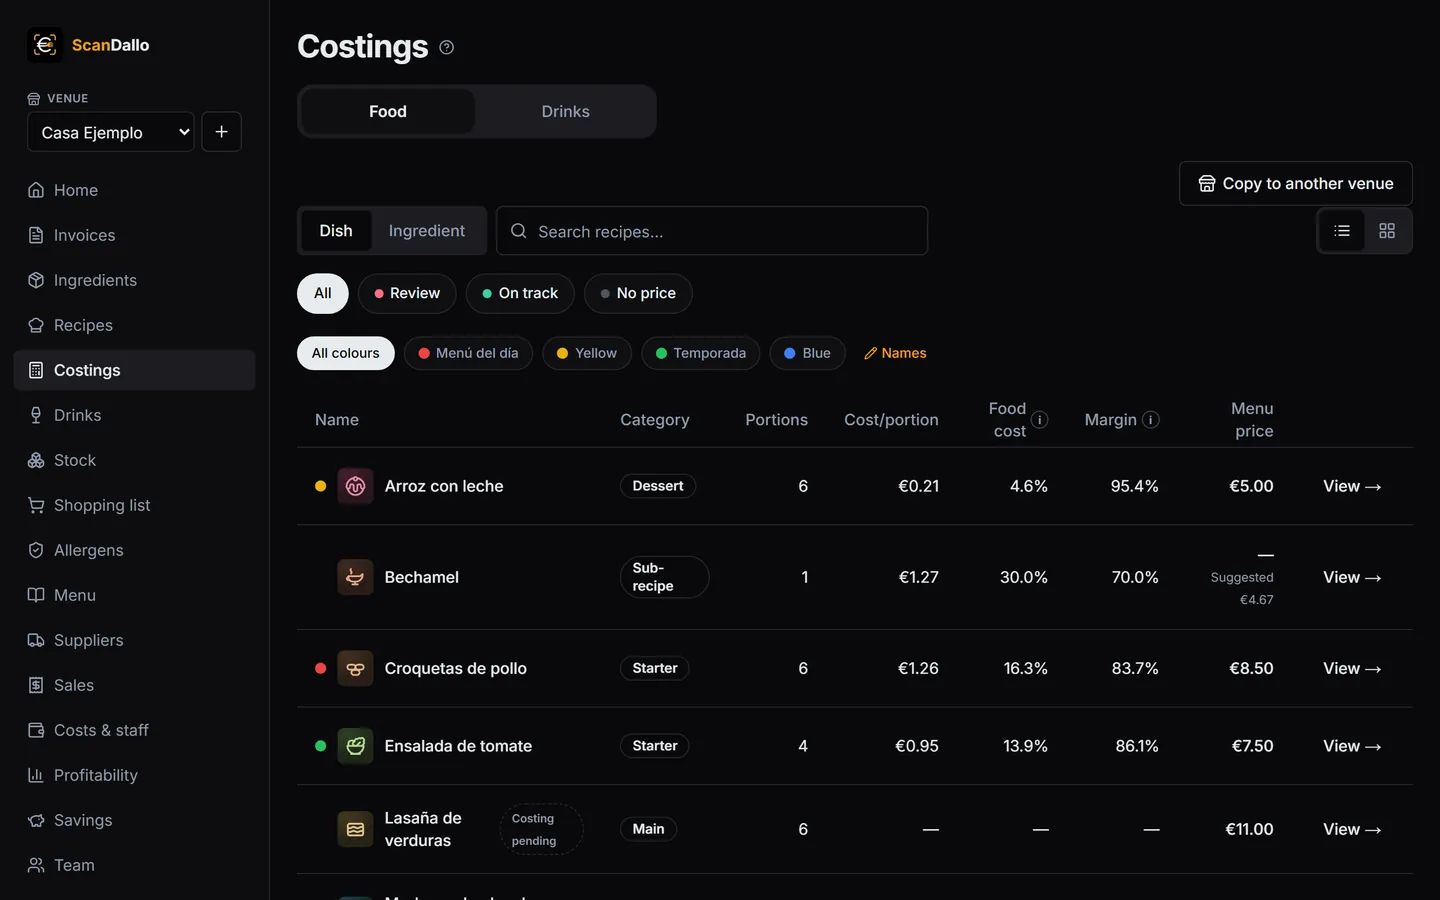
Your recipes appear as a grid, with a large photo of the dish (with no photo, you get a drawing of what it is: fish, paella, cake, small beer…); the ones without a costing yet are labelled “No costing”. Next to the search box you can switch to the list view. The app remembers your choice on each screen. The same goes for Costings, Drinks and Invoices; in Ingredients you can choose the compact view, one line per ingredient.
To organise things your way, you can give each recipe, costing or drink a colour from its page. It appears as a dot next to the name and you can filter by it. With Names, next to the filter, you give each colour a name for your venue (for example, red = “Set menu”).
Create a recipe
- In Recipes tap + New recipe (on a phone, New).
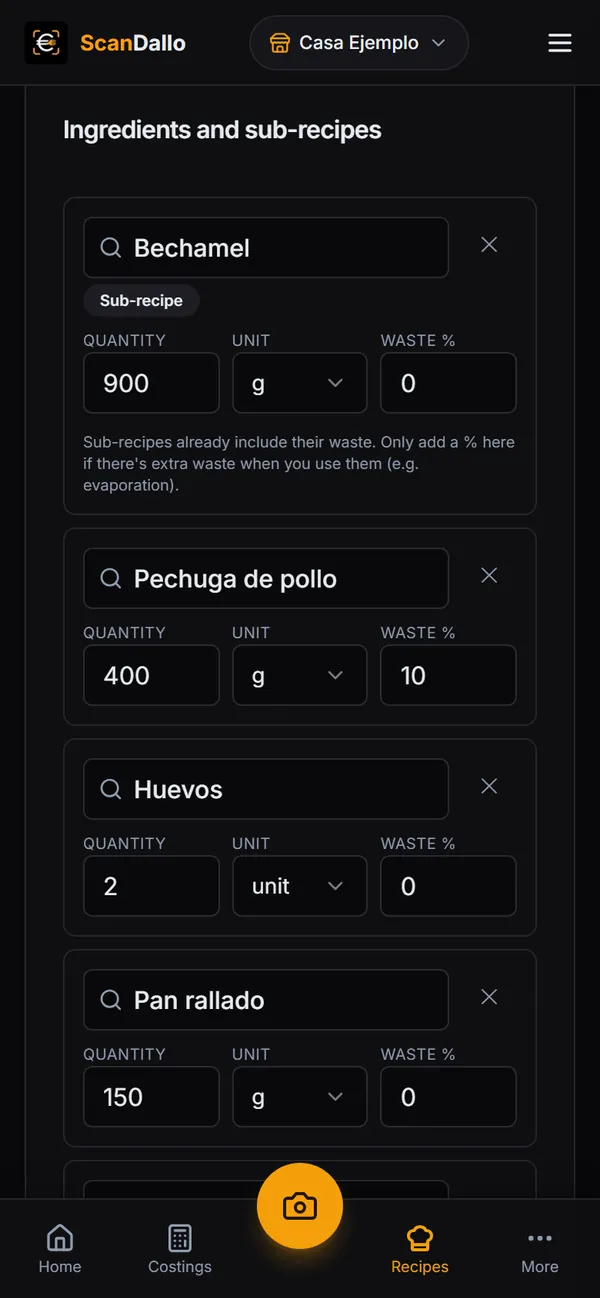
- Enter the name and, if you like, add a photo and a colour. Choose the category (Starter, Tapa, Sharing plate, Main, Dessert or Sub-recipe) and how many portions it makes.
- Tap + Add ingredient and type in the search box. You can search by supplier or by name, and create a new one on the spot if it doesn't exist.
- Enter the net quantity (what goes into the dish, already trimmed), the unit and the waste Varies by plan (what's lost when trimming or cooking).
- In Dish details write the method (as free text or step by step), the time, a menu description and internal notes.
- Tap Save recipe.
Write up your recipes as you have them
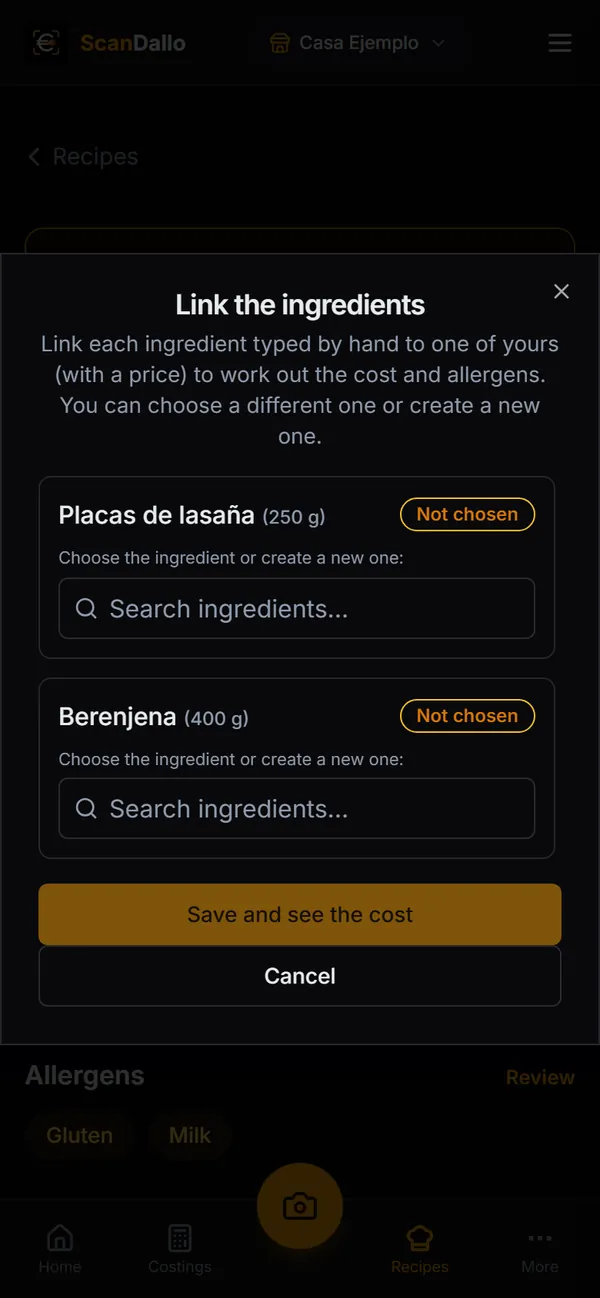
You don't need to have every product set up first. If an ingredient doesn't exist yet, type its name and choose Use “…” as typed. The recipe stays “Not linked” until you complete it.
Whenever you like, open the recipe and tap Link ingredients (it doesn't use anything up; you're also asked to do it when you tap Cost this dish): for each ingredient typed by hand, it suggests similar products of yours, if it finds any. You choose one (or search for or create another) and the app can then work out its cost and allergens.
Other ways to create recipes
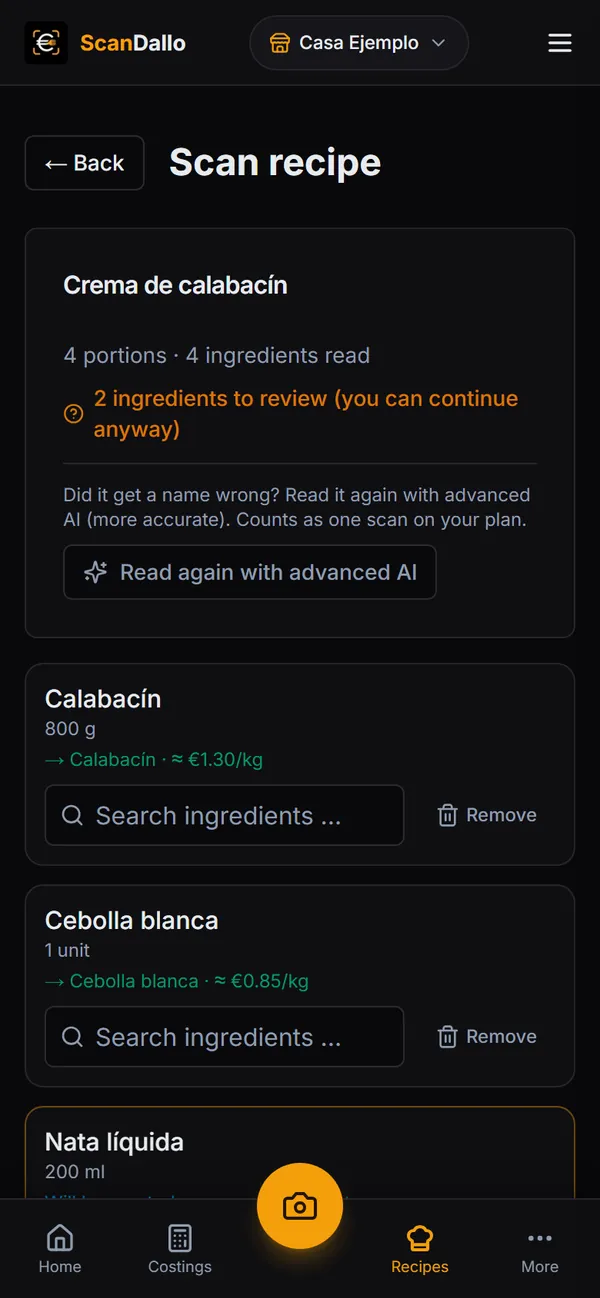
- Scan recipe (on a phone, in the button next to New): a photo of your paper recipe or a PDF. AI reads the title, the portions and the ingredients with their quantities, and compares them with your products. It uses one scan from your plan. It doesn't read the method.
- Import CSV: on a computer, all your recipes from a spreadsheet (CSV or Excel), with a sample template.
- Sample recipes: if you don't have any yet, a button creates 5 sample recipes and 13 sample ingredients so you can see the app working. They arrive already costed (as far as your plan allows): delete them or remove their costing when you start on your own.
Creating, scanning or importing recipes doesn't use up costings: only the ones you activate with Cost this dish count Varies by plan.
Sub-recipes: your sauces, doughs and stocks
A sub-recipe is a preparation you use in several dishes. Create it like any other recipe, with the category Sub-recipe, and fill in its total yield (how much it makes, for example 1,000 g). Then add it as one more ingredient in other dishes: its cost and allergens carry over to the dish automatically. If the price of tomatoes changes, so does the price of the sauce and of every dish that uses it.
Set menu
In Recipes, + Set menu (on a phone, in the button next to New): choose the starter, main and dessert options from your dishes, what's included per person (bread, a drink…) and the price. The cost per person is the average of the options; you also see the cost if someone picks the most expensive ones. It counts as one costing, and in Sales, Profitability and the menu it's just another dish.
Chapter 8
Costings: what each dish costs you
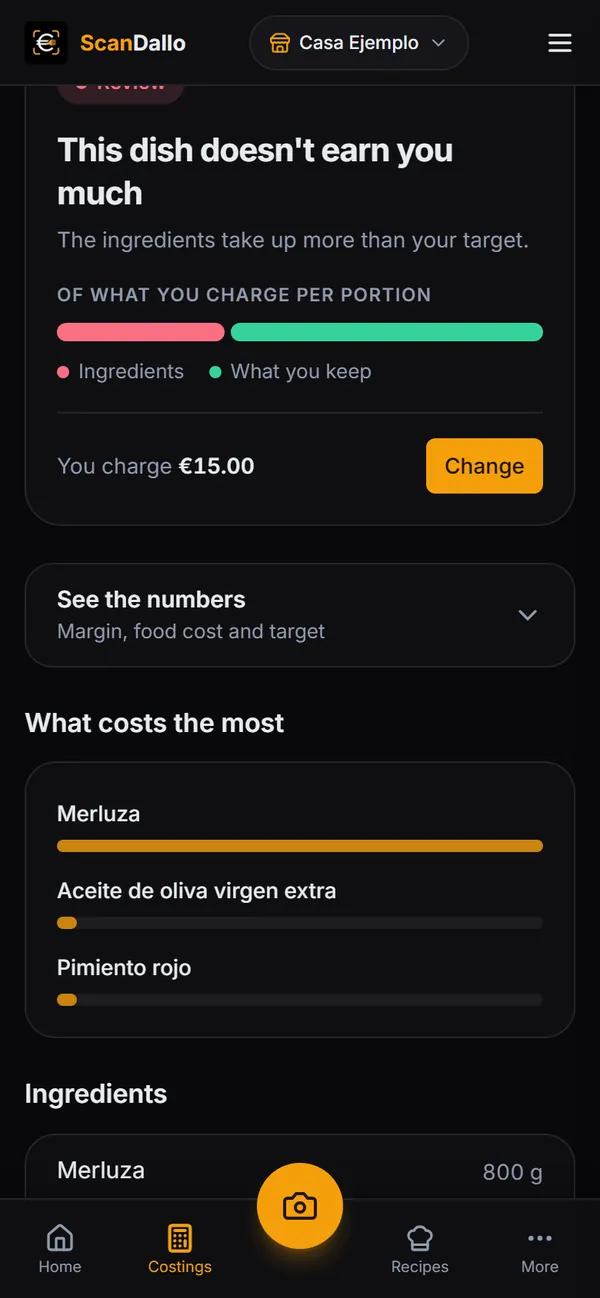
Open a dish from Costings (or from its recipe with “View costing”): first you see what it costs you, what to charge and how it's doing; the rest of the figures are under “See the numbers”; and “Edit” opens the full costing.
The costing page
- At the top, what each portion costs you.
- Menu price: on the left, the price that meets your margin (incl. VAT) and Use this price; on the right, the box with your menu price. As you type it you see a colour scale (you lose, small margin, meets your margin) and how the dish is doing, using the same rules as Profitability: what you keep from each portion, how far you are from your margin or what you lose. Save price puts it on your menu.
- See the numbers: cost per portion, menu price, food cost, what you keep, suggested price and your target.
- What costs the most (the most expensive ingredients) and the ingredients with their quantities. At the bottom, Edit and Spec sheet.
In the Costings list, each dish appears in a grid showing how it's doing, what it costs and the suggested price, and you can filter by status (Review, Watch, On track…). To see all the figures at once, switch to the list view.
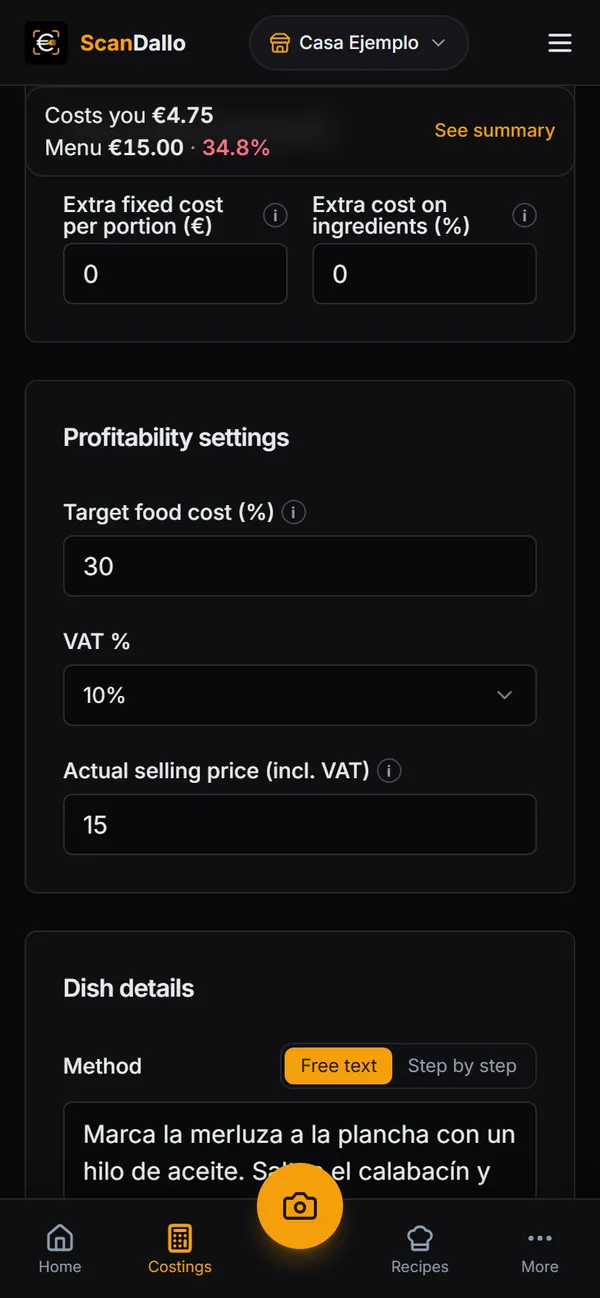
What you can adjust (in “Edit”)
- Extra costs (overheads): an extra fixed cost per portion (packaging, energy…) and an extra cost on ingredients as a %.
- Target food cost: how much of the price you want to go on cost. It's set at 30%; in hospitality it's usually between 28% and 32%.
- VAT: 4, 10 or 21%. It's only added to the menu price: costs are always excluding VAT.
- Actual selling price (incl. VAT): the price you sell it at today. It's optional, but without it the app can't tell whether a dish is losing money.
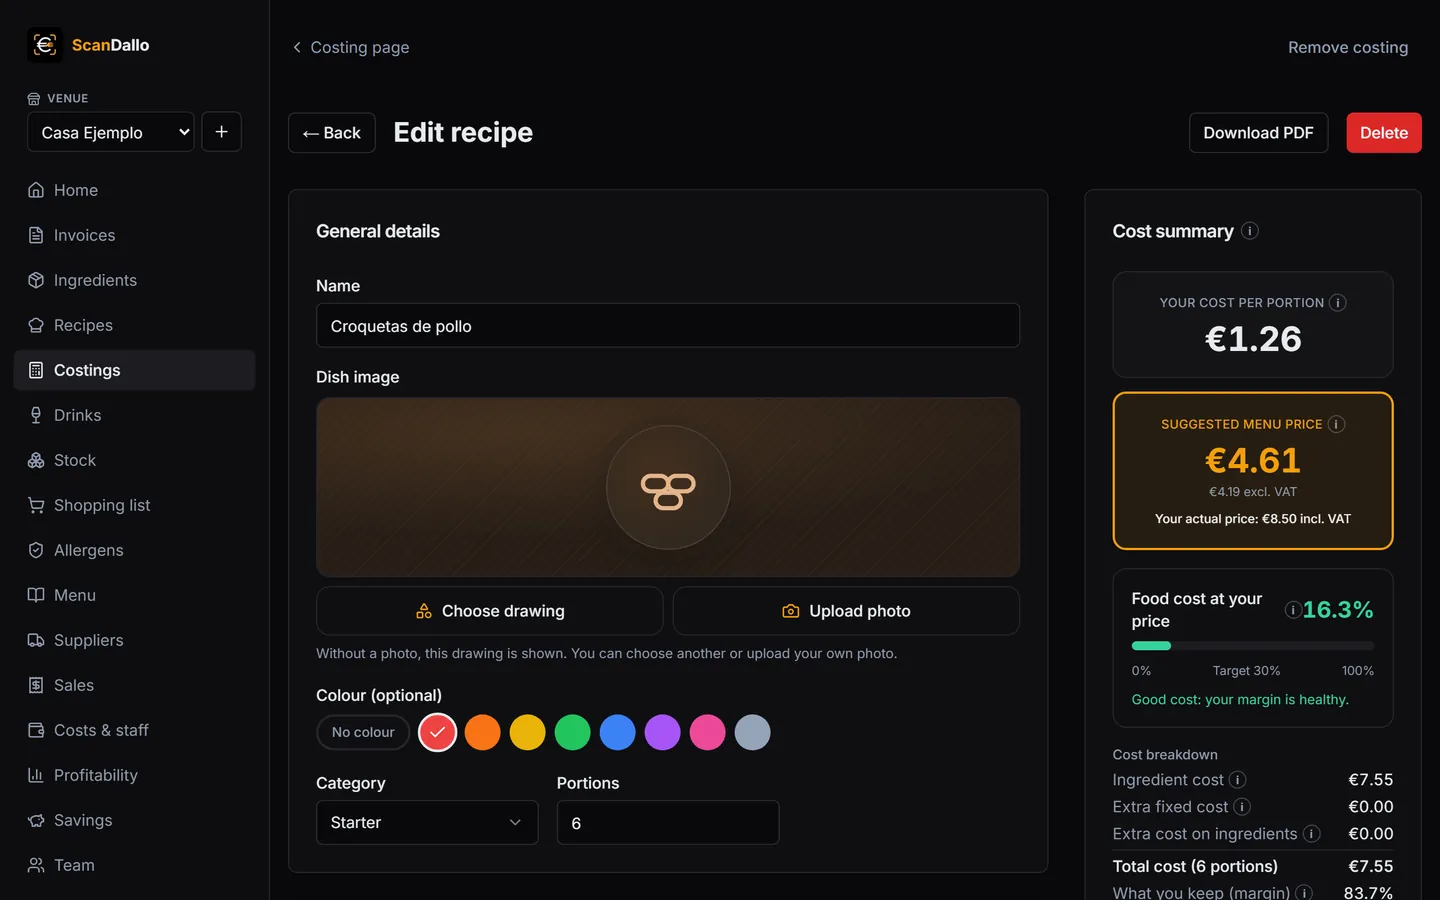
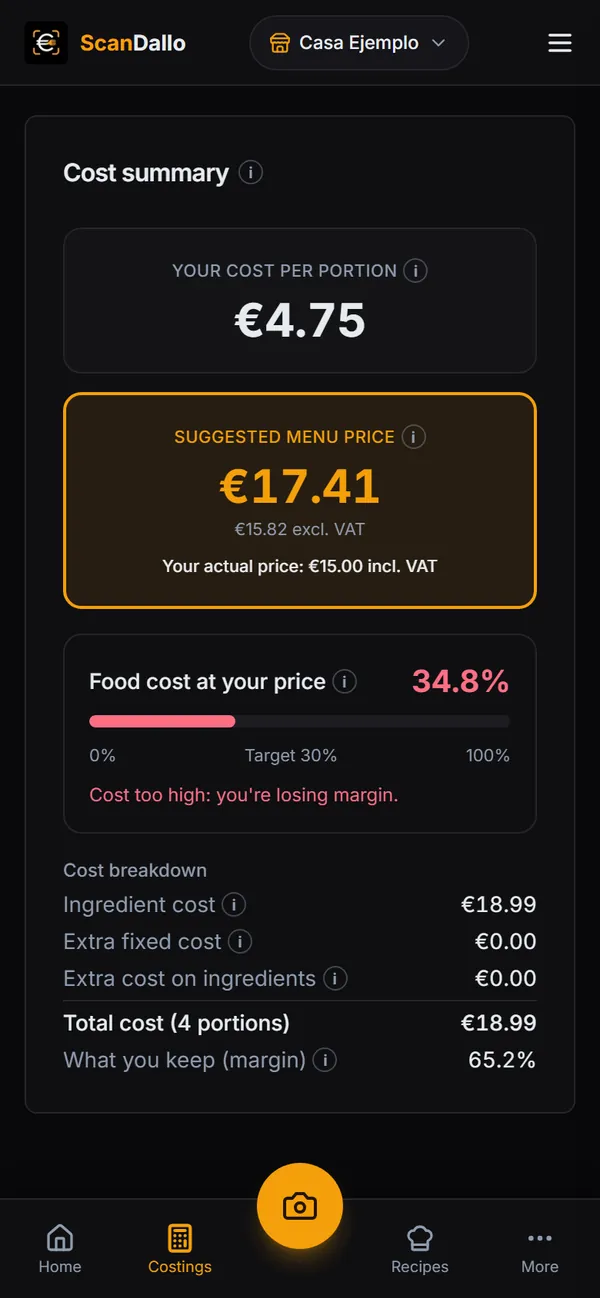
The cost summary
- Your cost per portion.
- Suggested menu price incl. VAT (and below it, excl. VAT) to hit your target.
- How much of the price goes on cost (if you've entered your actual selling price), with a traffic light: green if you're within your target, amber if you're a little over and red if you're well over.
- Cost breakdown and the margin you keep.
The summary updates as you type. Changes are saved when you tap Save recipe.
Waste, explained
Waste is what's lost when trimming or cooking. If 1 kg of tomatoes leaves you 800 g once trimmed, the waste is 20%, and to have 1 kg trimmed in the dish you actually buy 1.25 kg. That's why in the recipe you enter the net quantity (what goes into the dish) and the waste, and the app works out the cost of what you really have to buy. Waste calculations depend on your plan Varies by plan.
Spec sheet as a PDF
From the costing page, Spec sheet (or Download PDF in the editor) creates the dish's spec sheet Varies by plan: your business name, ingredients with quantity, waste, price and cost, extra costs, cost per portion, suggested price excl. and incl. VAT, and the cost and margin based on your actual selling price (if you haven't entered one, on the suggested price). It doesn't include the method, the photo or the allergens (allergens have their own PDF). It does include your internal notes: bear that in mind if you share it.
Chapter 9
Drinks: the cost of every glass
Drinks are in the “Drinks” tab of Recipes and Costings: you choose the type, enter what goes in each glass and the app tells you what it costs and what to charge, based on the type of drink.
- In Recipes or Costings, tap the Drinks tab (it switches in place) and tap New drink.
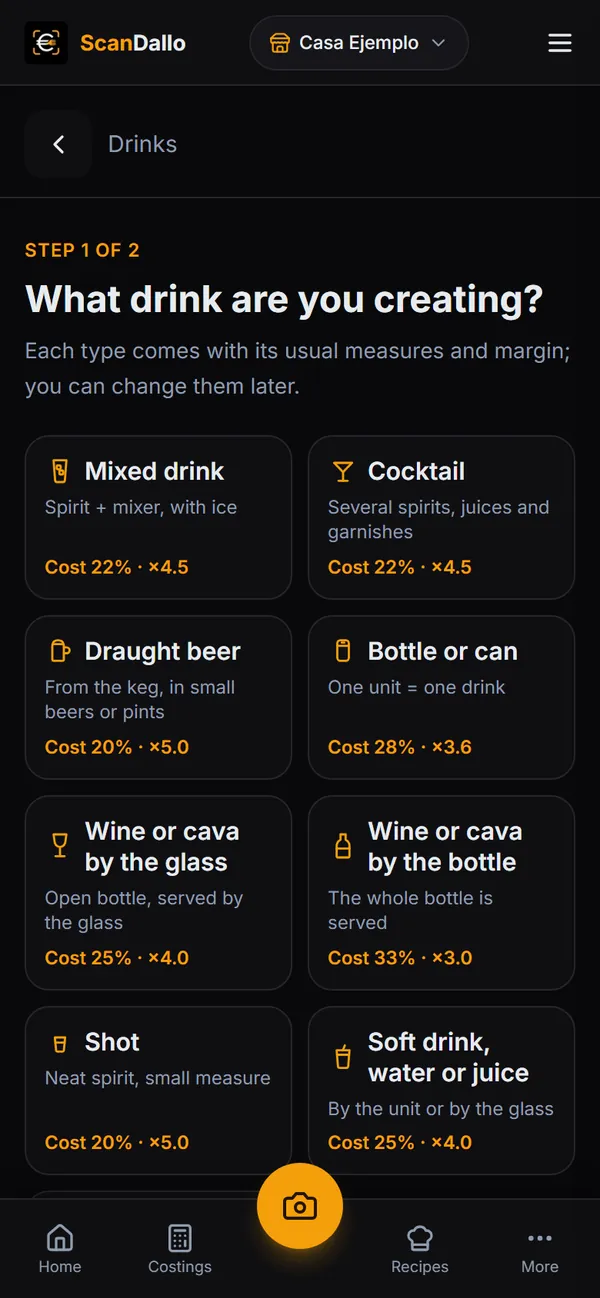
- Choose the type: mixed drink, cocktail, draught beer, bottle or can, wine or cava by the glass or by the bottle, shot, soft drink, water or juice, coffee or herbal tea, or other drink, with whatever name you like. Each type comes with its usual measures.
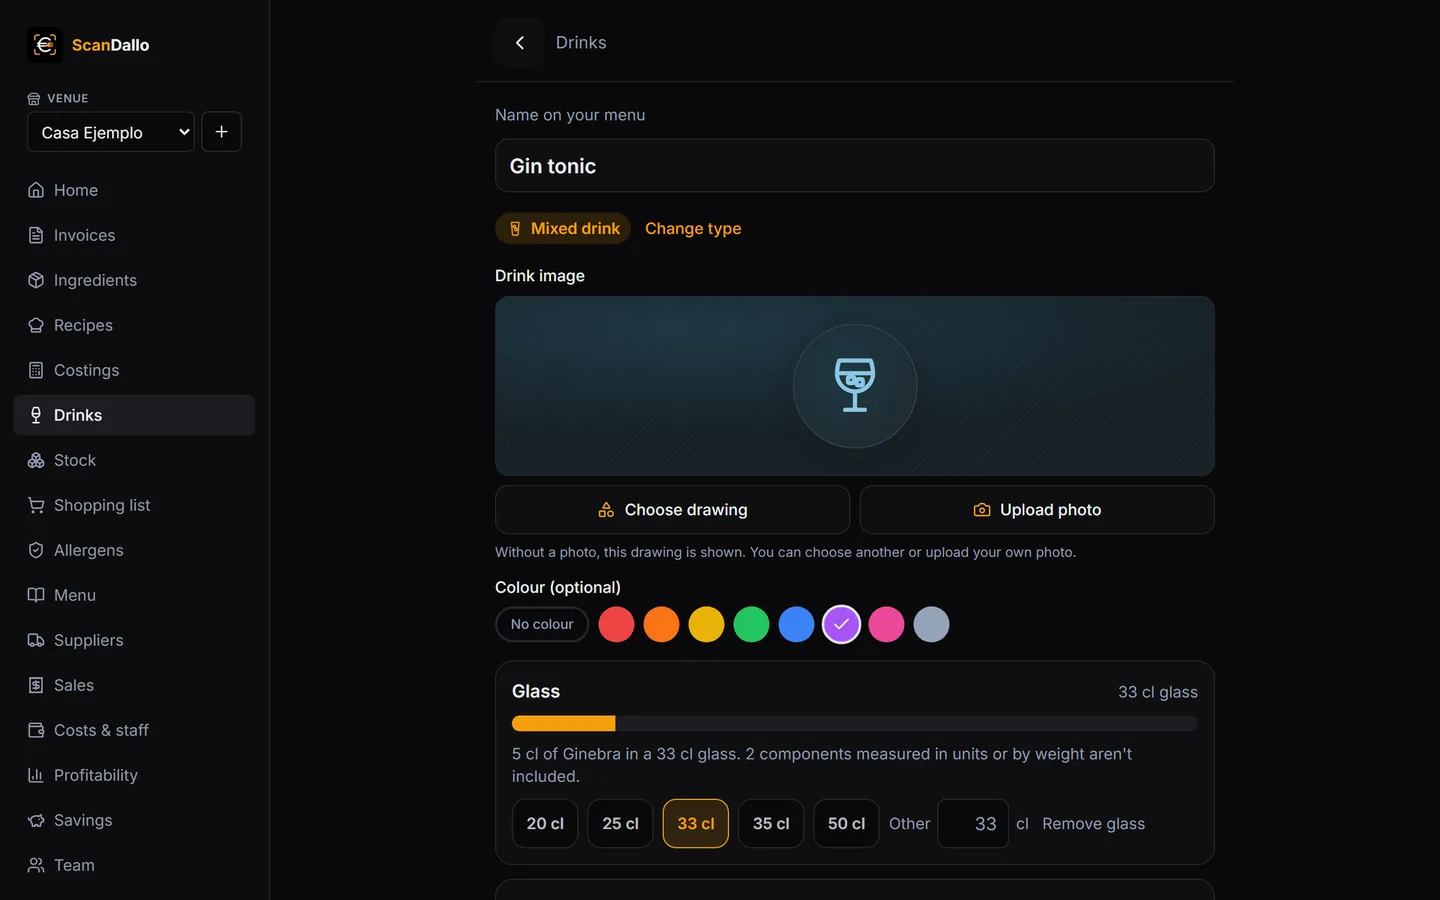
- Under What goes in it, choose the bottle, keg or mixer from your ingredients (or create it with its name, what it costs you and the size of the container) and the measure for each glass: 4, 5, 6 or 7 cl of spirit, the ml in a small beer or a glass of wine, one unit…
- Add the extras per glass (ice, lemon, garnish…) with their cost and, if you like, a photo of the drink and a colour.
- Under Price you'll see the cost per glass, the suggested price incl. VAT and, if you enter your menu price, whether the margin is healthy. Tap Save drink.
Each drink counts as an active costing in your plan Varies by plan, except coffees, soft drinks and bottles or cans. The suggested margin depends on the type of drink and your type of venue (bar or restaurant, or late-night venue). You can adjust it in Settings → Business → Drink margins; drinks you've already created don't change on their own.
Chapter 10
Allergens and a digital QR menu
You mark the allergens for each ingredient once and the app works out the allergens in each dish. You review them, confirm them and publish them on a menu your customers open with a QR code.
1. On your ingredients
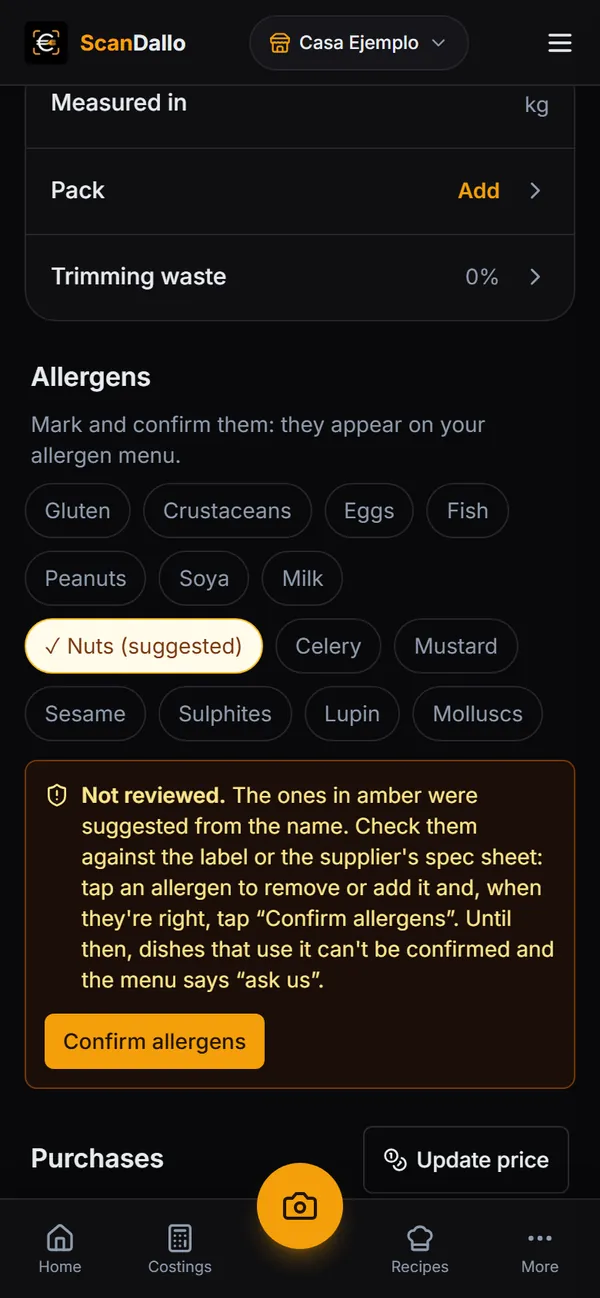
On each ingredient's page, mark which of the 14 allergens in Regulation (EU) No 1169/2011 it contains. When you create an ingredient, the app already suggests allergens based on its name (for example, flour → gluten, almond → nuts); the suggestions stay amber so you can review them.
When they're right, tap Confirm allergens (or Confirm it has none). While an ingredient hasn't been reviewed, the dishes that use it can't be confirmed. In Allergens, the notice about ingredients to confirm and its Review button take you through them one by one.
2. On each dish
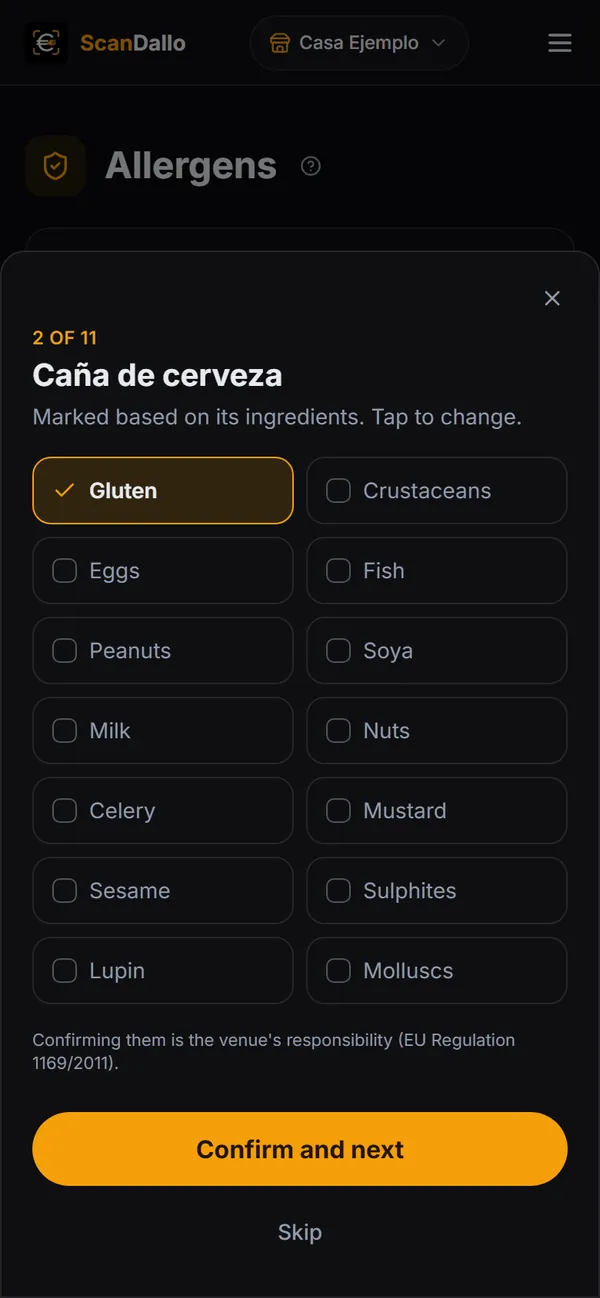
In Allergens you see how many dishes you've reviewed and which are left (the ones on your menu first). Review opens each dish with its 14 allergens already marked from its ingredients; tap one to change it, and Confirm and next moves on to the next dish.
You can also do it in the recipe: Dish allergens shows the ones it contains, worked out from its ingredients and sub-recipes. If needed, tap one to add or remove it for that dish only. If any ingredient still needs reviewing, the app tells you which. When they're right, tick “I confirm I've reviewed these allergens and they're correct”. From there you can download the dish's allergen PDF.
3. Your public QR menu
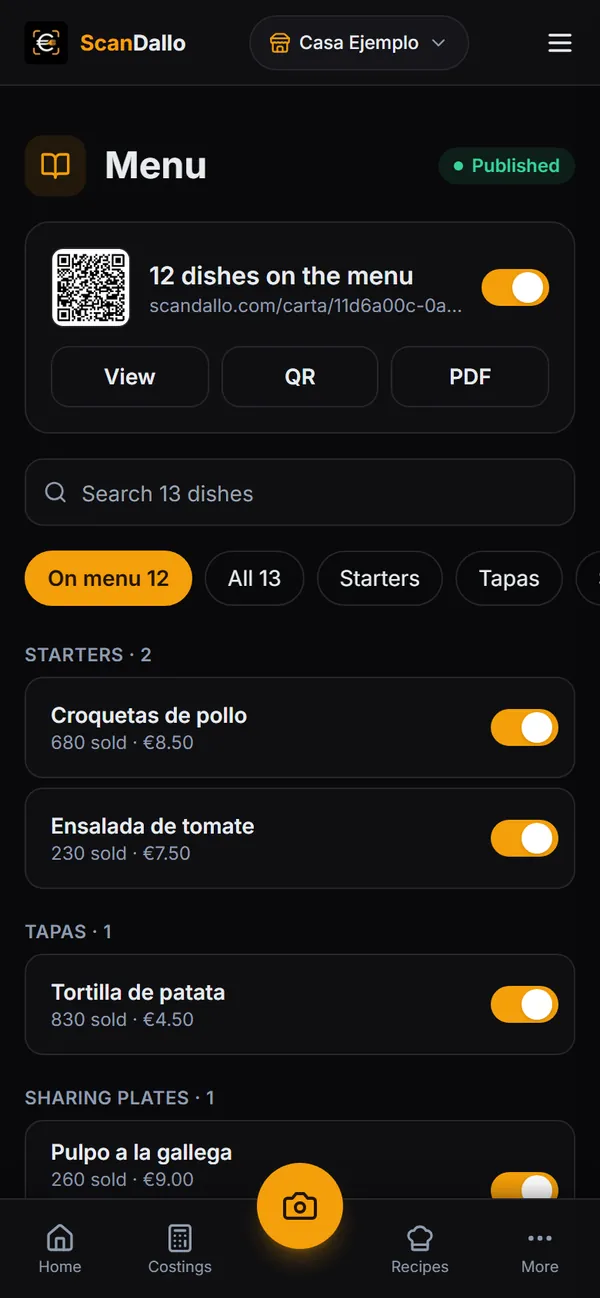
In Menu you choose which dishes appear. Each dish has a switch that saves instantly (with Undo in case you make a mistake). New dishes start off the menu, and ones with unlinked ingredients can't be added until you complete them.
If you import your sales, Add your best sellers suggests the dishes you sold last month, already ticked, and dishes that haven't sold for 3 months are hidden (the search still finds them).
At the top you turn on the public menu, and you have View, the QR code to print and put on your tables, and the PDF of the full menu to keep printed at the bar.
What your customers see
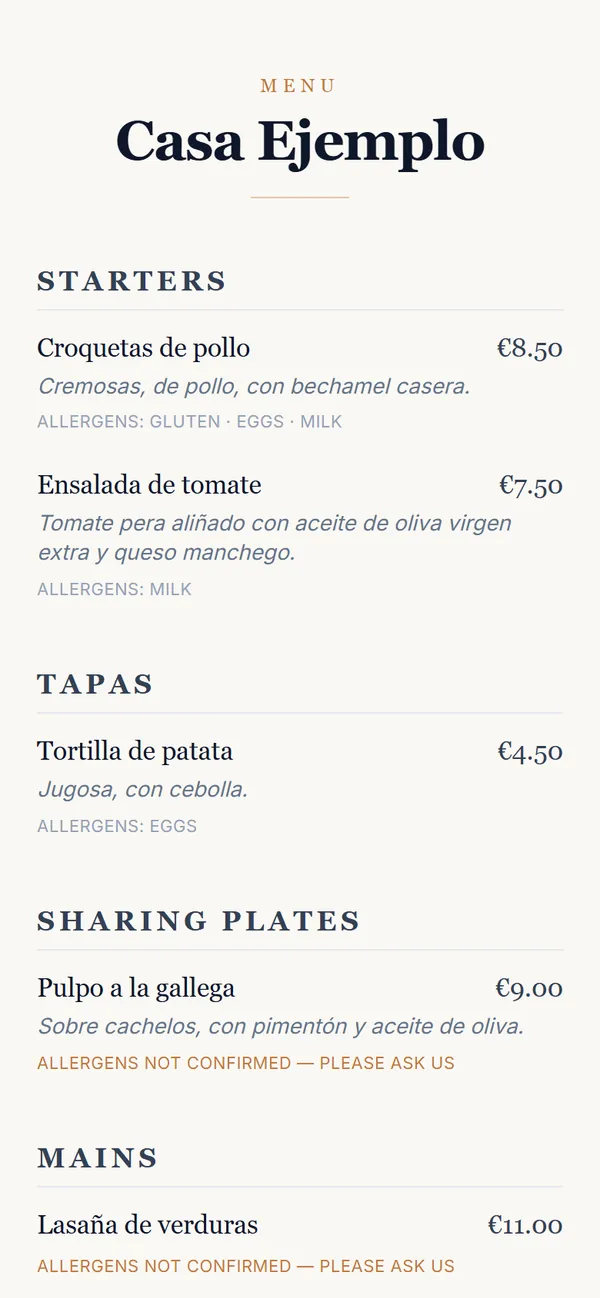
A simple page with your restaurant's name, the dishes by section, their description, their price (if you've set a selling price) and their allergens. It never shows costs, ingredients or photos, and it updates itself when you change something in the app. Its headings follow the language of your customer's phone (English or Spanish); dish names and descriptions appear exactly as you wrote them.
It only states a dish's allergens if you've confirmed them and all its ingredients have been reviewed. If not, it shows “Allergens not confirmed — please ask us”. And if you later change what goes into the dish or the allergens of one of its ingredients, the confirmation is removed automatically until you review it again.
Chapter 11
Sales: what you sell each month
Import your till report or enter what you sold by hand, and see at a glance what sells most and least.
Import or enter your sales
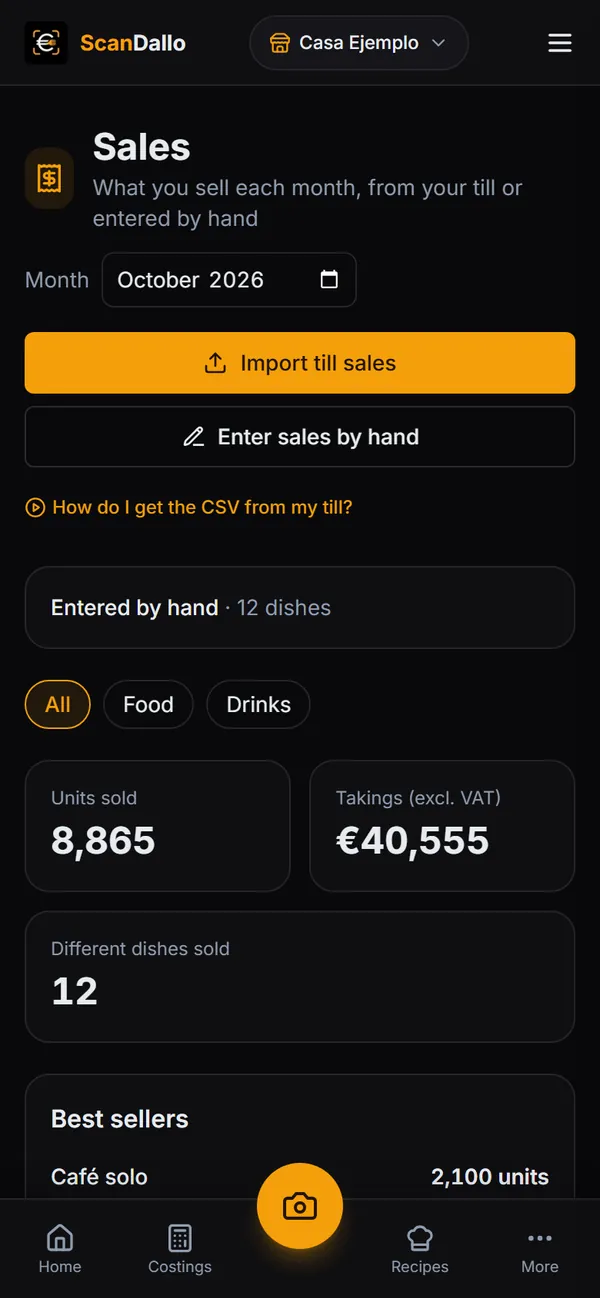
In Sales, choose the month at the top right. Just below you have the two buttons, Import till sales and Enter sales by hand, and the link How do I get the CSV from my till?, which opens a video (in Spanish).
If your till (cash register) gives you a sales by item report, upload it exactly as it comes out of the till (CSV or Excel, including the .xls many tills export). The first time, the app explains step by step which file to upload. It recognises the report even if it includes categories, totals and dates (it discards them itself), tells you whether it matches your till's total, lets you leave out whole categories (drinks, for example) and choose the month, asks “Are these the same dish?” when a name looks like one of yours, and doesn't save anything until you tap the import button. Dishes you don't have yet are created as “Missing recipe” (they don't use up costings), unless you untick that option. If you upload a report for the same month again, the app replaces, adds or asks you, depending on its dates, without counting anything twice.
Before importing, the Stock step shows what comes out of your stock with those sales (each dish's ingredients, waste included) and what can't be taken out and why. If you sell a set menu, it asks which dishes were served. The Take it out of stock box decides whether those sales touch stock; old months come unticked. Sales you log by hand do the same.
Entering sales by hand
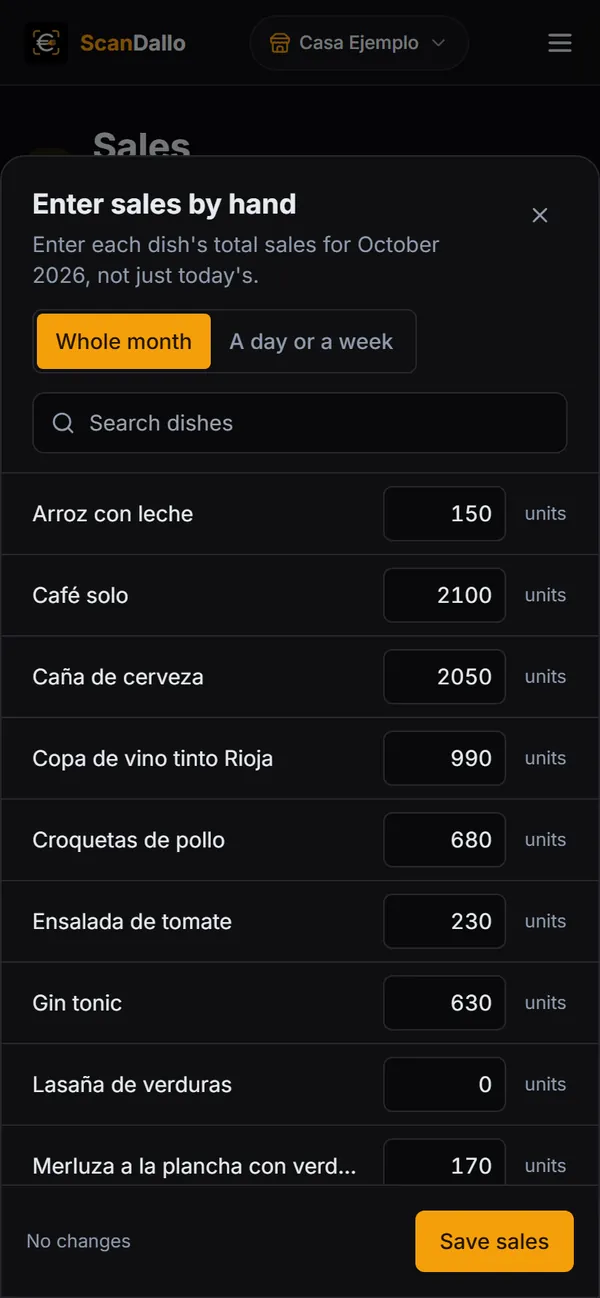
If you don't have the report, tap Enter sales by hand: a panel opens with a search box and all your dishes. Enter the units sold of each one over the whole month, not just today, and tap Save sales. Only the dishes you've changed are saved. If you'd rather go day by day, choose A day or a week: what you enter is added to the month (a week that spans two months is split between them).
What you see in Sales
- The month's status: which days the imported data covers (with a bar showing the days covered), how many dishes and when you uploaded it.
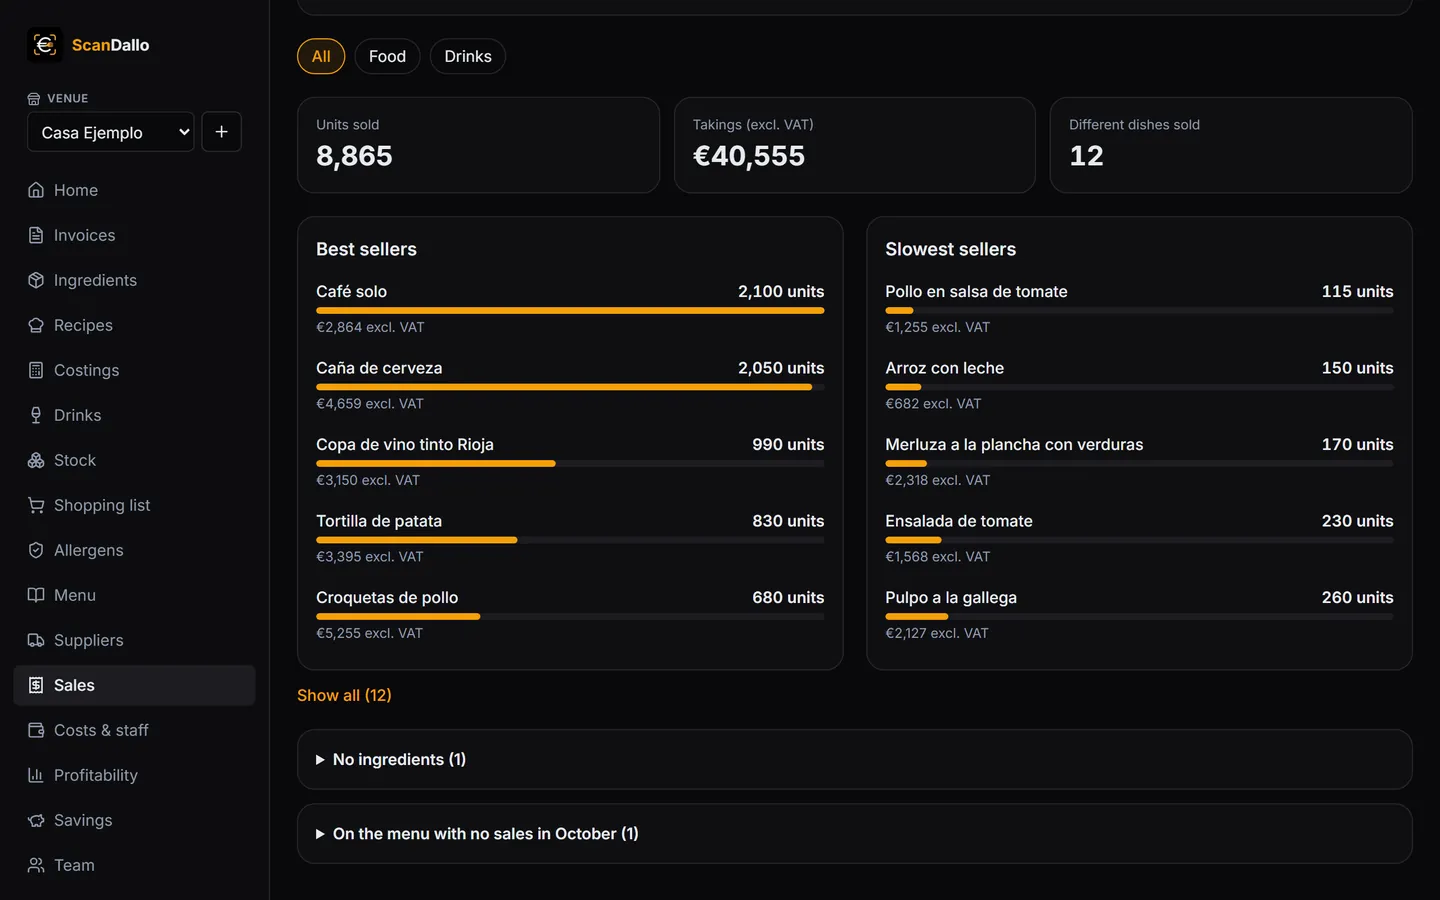
- The summary: units sold, takings excl. VAT and the number of different dishes sold. For a month that has ended, each figure is compared with the previous month; the current month shows as “Provisional”, because it's only part-way through.
- Best sellers and slowest sellers: five of each, with a bar, the units and the takings. Show all shows the whole list. You can view just food or just drinks, and tapping a dish opens its recipe.
- Warnings, folded away: dishes sold without a costing or without a selling price, ones the report created without ingredients, ones on the menu that didn't sell, and the month's import history.
Sales doesn't talk about margins: what each dish earns you, and what to do about it, is in Profitability (chapter 12).
Chapter 12
Profitability, costs & staff
Two screens that tell you whether your dishes and your business are making money.
Profitability
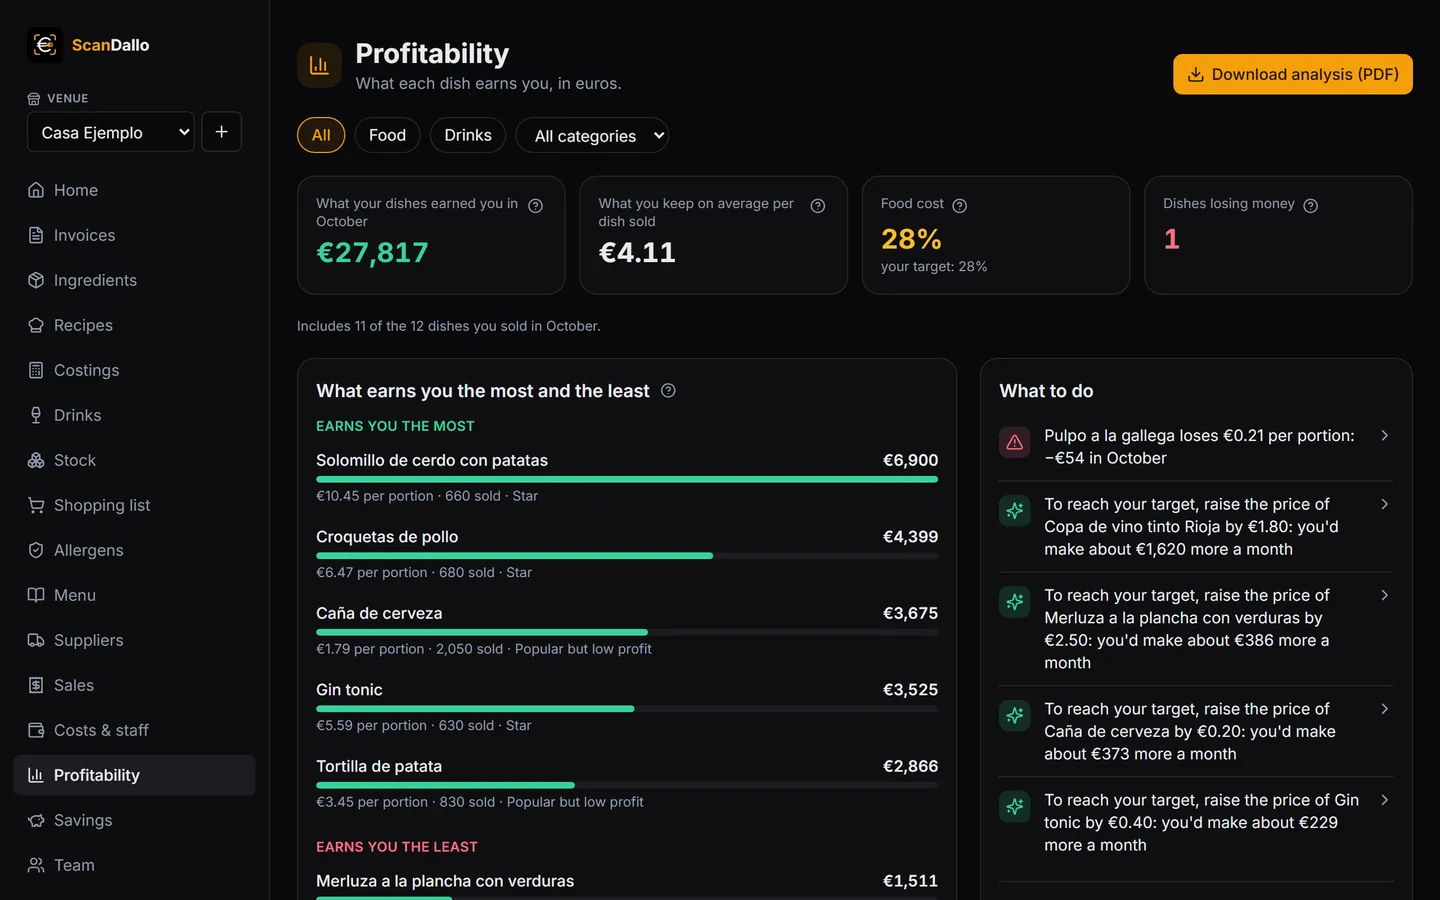
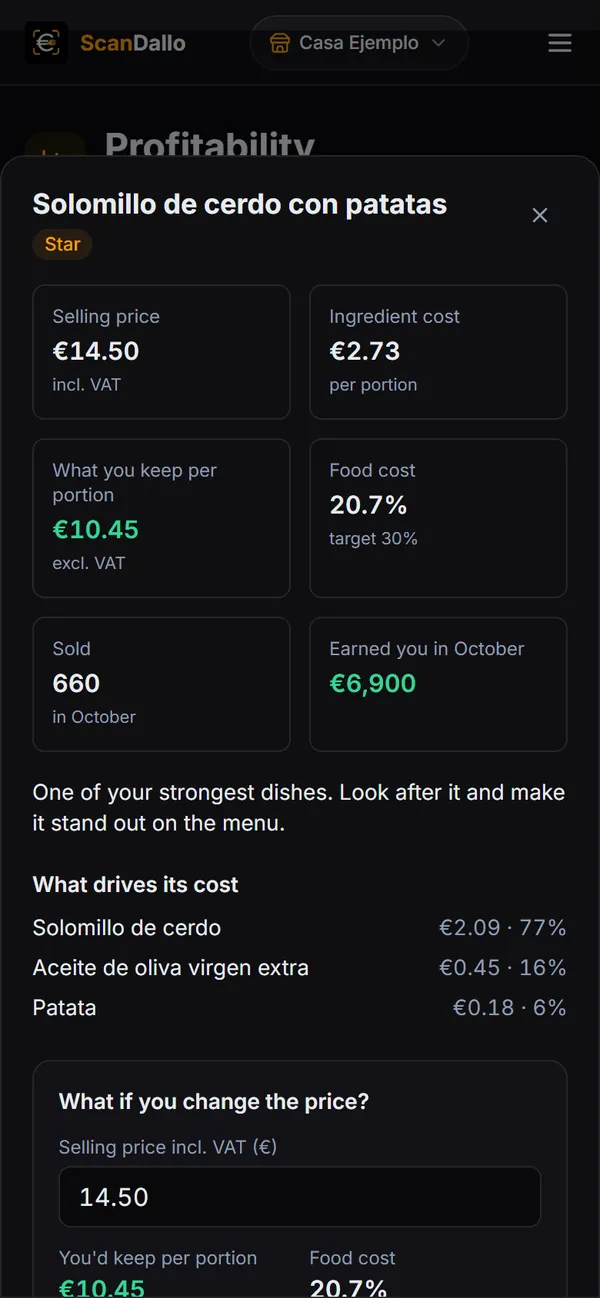
- At the top, what your dishes earned you in the month: what you took for them on your till, excl. VAT, minus what their ingredients cost you. Alongside, what you keep on average per dish sold, your food cost against your target, and the dishes losing money. Each figure has a ? that explains it, and below you see how many of the dishes you sold are included in the analysis.
- What earns you the most and the least: your dishes ranked by what they earned you in the month, each with a bar, what you keep per portion and the units sold. The ones losing money are in red. You can filter by food, drink or category and choose the month.
- What to do: the actions with the most euros at stake, for example raising a dish's price a little to reach your target, or a dish that costs you more than three months ago because an ingredient has gone up. Dishes losing money always come first. Below, the ones that leave a good margin but don't sell much, so you can push them.
- Menu map: your dishes in four groups, based on how much each one sells and what it leaves you per portion, compared with your menu's average: Stars (sell a lot and leave a good margin), Profitable but slow sellers (promote them), Popular but low profit (raise the price a little or cut the cost) and Weak (review them or take them off).
- Tap a dish to see its page: price, cost, what it earns you, what costs the most and how it has changed over the last three months. With “What if you change the price?” you try another price and see straight away what it would leave you (it isn't saved: you change the price in the costing).
- Download analysis (PDF) Varies by plan: a report for the owner or whoever does the accounts, with what earns the most and the least, the menu map, a page on each key dish and an action plan.
Costs & staff
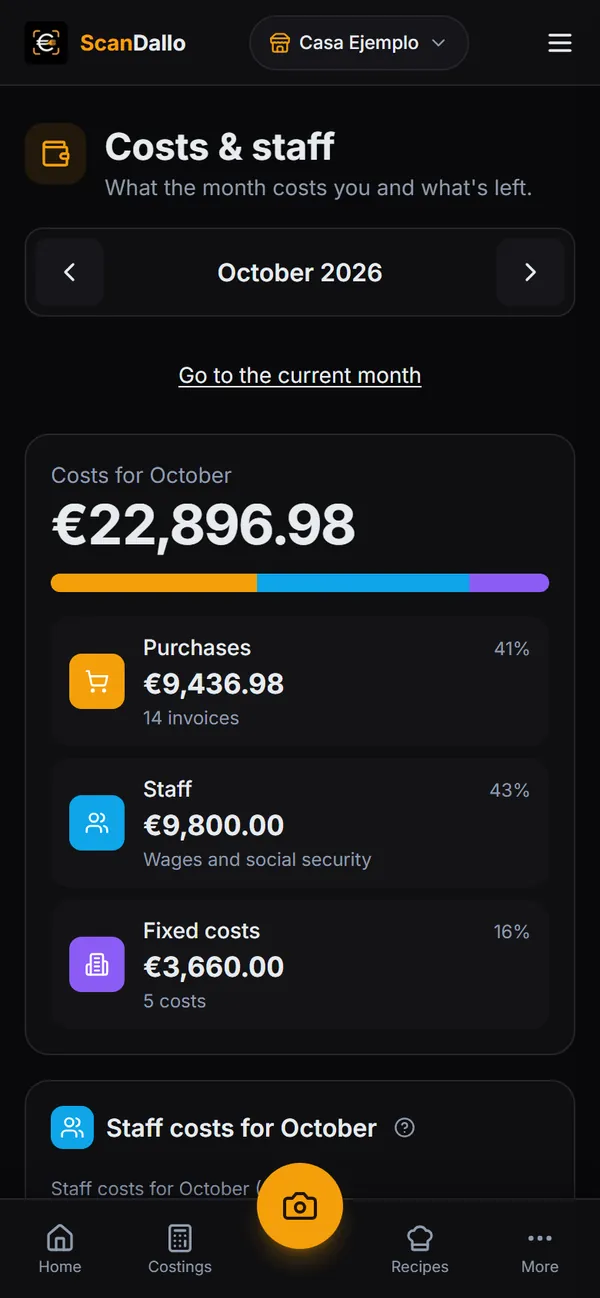
Choose the month with the arrows. At the top, in large type, the month's costs and their three parts, each in its own colour: the purchases (the month's invoices), the staff and the fixed costs. Just below, you enter what your staff cost that month (wages and social security) and your fixed costs (rent, electricity, accountant, insurance…), which apply to every month and are entered excluding VAT.
- What's left: sales (excl. VAT) minus costs. If something's missing, To review tells you what, in one line, with a link.
- Food: what it should have cost you according to your costings, and what you actually bought. The difference is usually waste, items on the house or over-generous portions. A month that has ended is worked out with the prices on its last day, so it doesn't change if prices go up later.
- Break-even point and prime cost: what you need to sell to cover fixed costs and staff, and purchases plus staff as a share of sales (the benchmark is staying below 60%).
Chapter 13
Stock, shopping list and savings
Keep track of what you have, order what you need and buy at the best price.
Stock
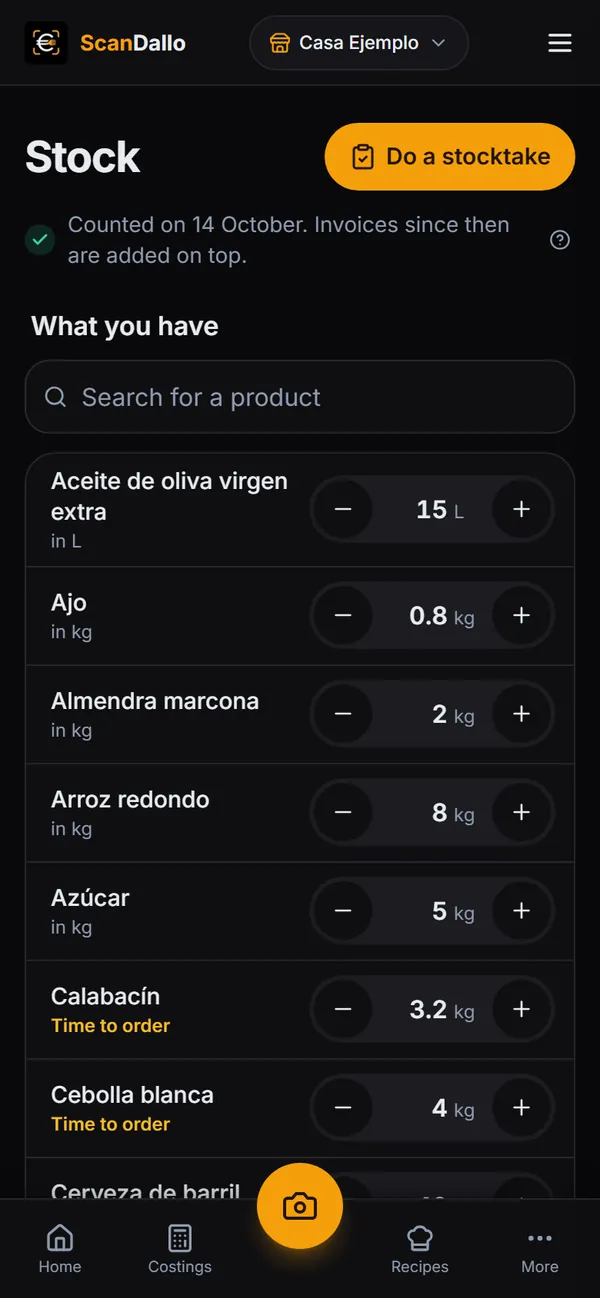
- What you have: goes up automatically with every invoice you save and down with the sales you import or log (each dish's ingredients, waste included). You adjust it with the + and − buttons or by typing the quantity. If a product is below its minimum, it says Time to order. On each product's page, Stock movements tells you what moved it.
- Losses (the Log a loss button): something that breaks, goes out of date, goes off or gets lost, a product or a whole dish. It comes out of stock and Losses shows what it cost you this month; if you get it wrong, Undo.
- Stocktakes (the Do a stocktake button at the top): record what's really there on a given day. The sheet comes filled in with your stock and you only correct what doesn't match. When you save, your stock is set to what you counted. If you record it on a later day, choose the Stocktake date: anything that came in on invoices afterwards is added and anything sold afterwards is taken off. Sales on the stocktake day itself count as already counted: do it before opening or after closing.
- What you're losing in the kitchen (the variance report): with two stocktakes, it compares what you actually used with what you should have used according to your sales and recipes, and tells you in euros where you're losing it (spoilage, generous portions…). The losses you log count as already explained.
Shopping list
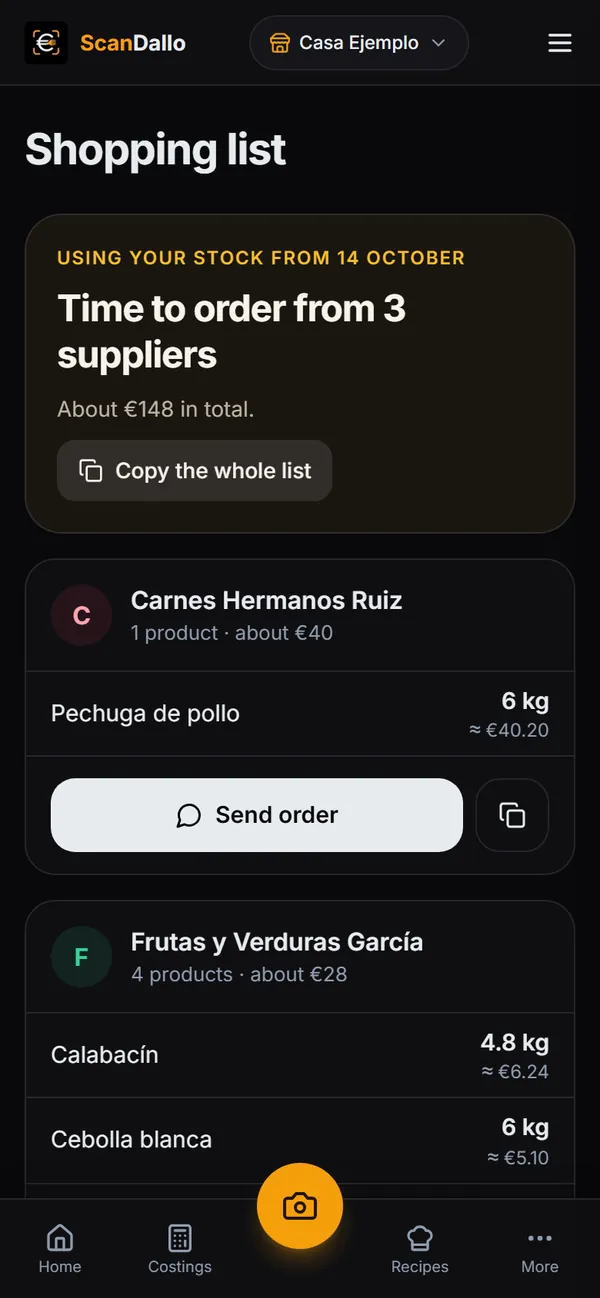
In How much of each item to keep, set the minimum (below it, it's time to order) and the target (the level to restock to) for each product. At the top, the app tells you how many suppliers it's time to order from and, in a block per supplier, what to order, with an estimated cost. Send order opens WhatsApp with their number (if it's on their page) or the share menu; you can also copy it.
Orders are grouped by each ingredient's usual supplier, which you choose in Edit ingredient.
Savings and price alerts
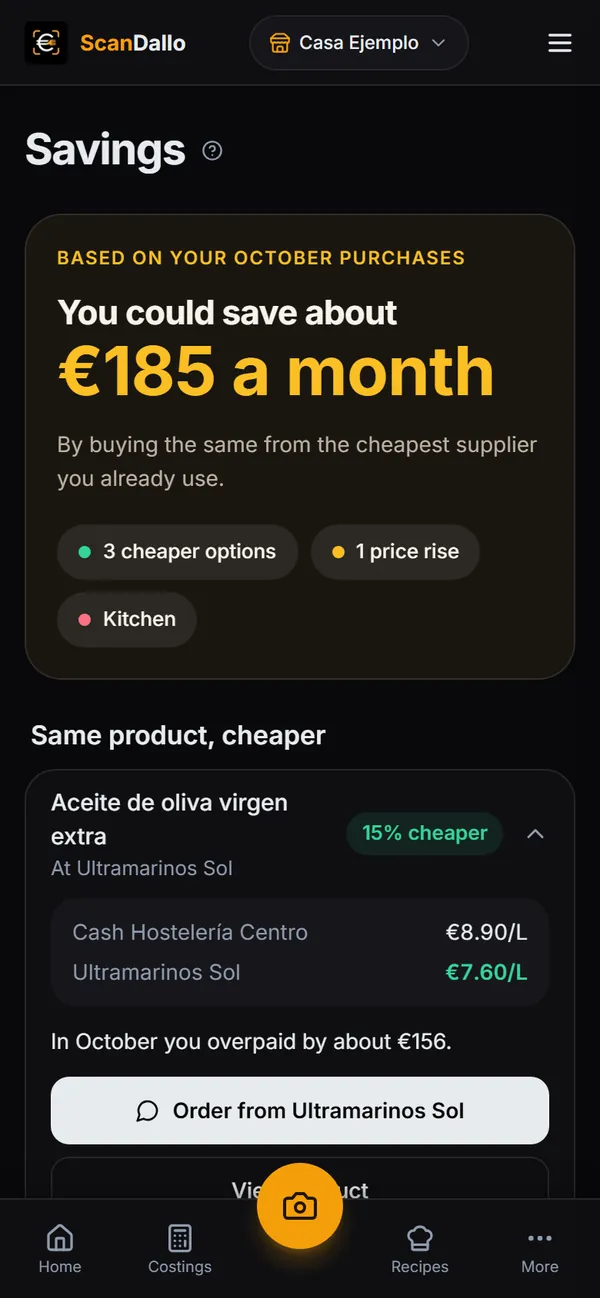
- Savings (in More → Money): at the top, what you could save a month by buying the same things from the cheapest supplier you already use, based on last month's purchases. Below, Same product, cheaper (both prices, how much extra you paid and a button to order it from that supplier), Price rises Varies by plan (rises of 10% or more in the last two months and how many dishes use those products) and What you're losing in the kitchen (with two stocktakes, what you used beyond what you sold). It doesn't take delivery charges, quality or payment terms into account.
- If you've just started, you see the steps that fill it instead: scan your invoices, buy something from two suppliers and do two stocktakes.
- Price-rise alerts Varies by plan: when you save an invoice, if a price per unit rises by 10% or more compared with your previous purchase, you get an email.
- Monthly summary by email: on the 1st you can receive a summary of the previous month's purchases, only if the app finds a product that costs you at least 8% more than it would from another supplier. Both alerts are turned on or off together in Settings → Business → Email alerts.
Chapter 14
Your team: staff and permissions
Your cooks, your manager or your business partner can use the app with their own account, and you decide what each of them sees: for example, recipes and allergens, without prices, sales or wages.
1. Invite each person
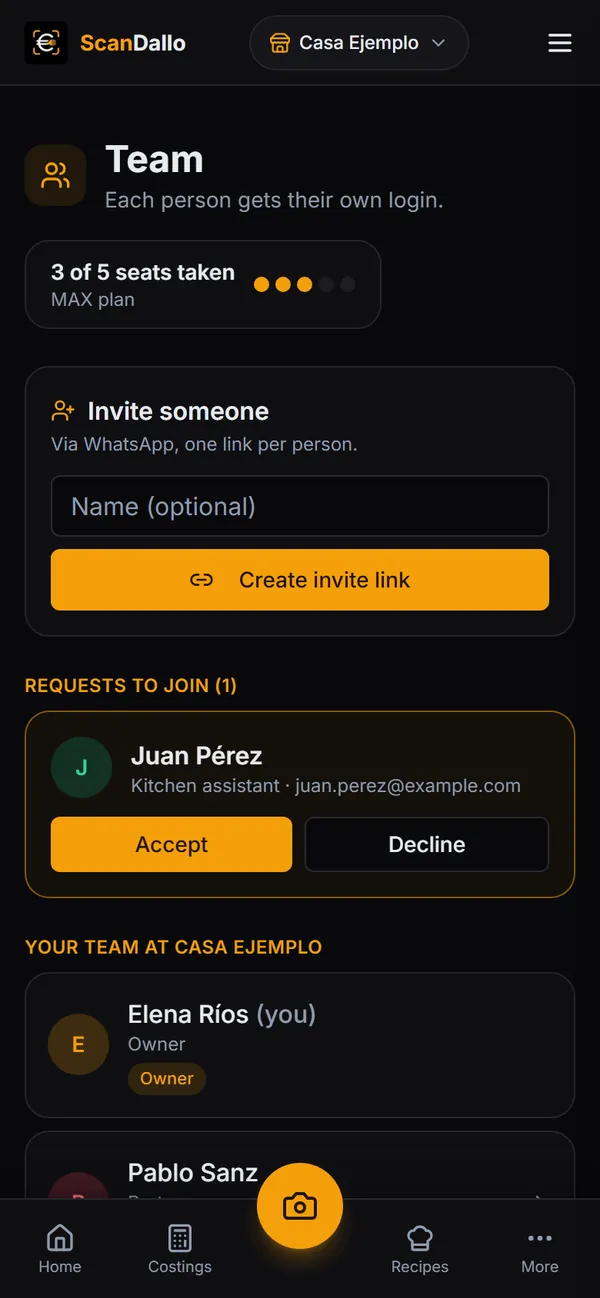
- In More → Team (on a computer, Team in the sidebar), enter who it's for if you like, and tap Create invite link.
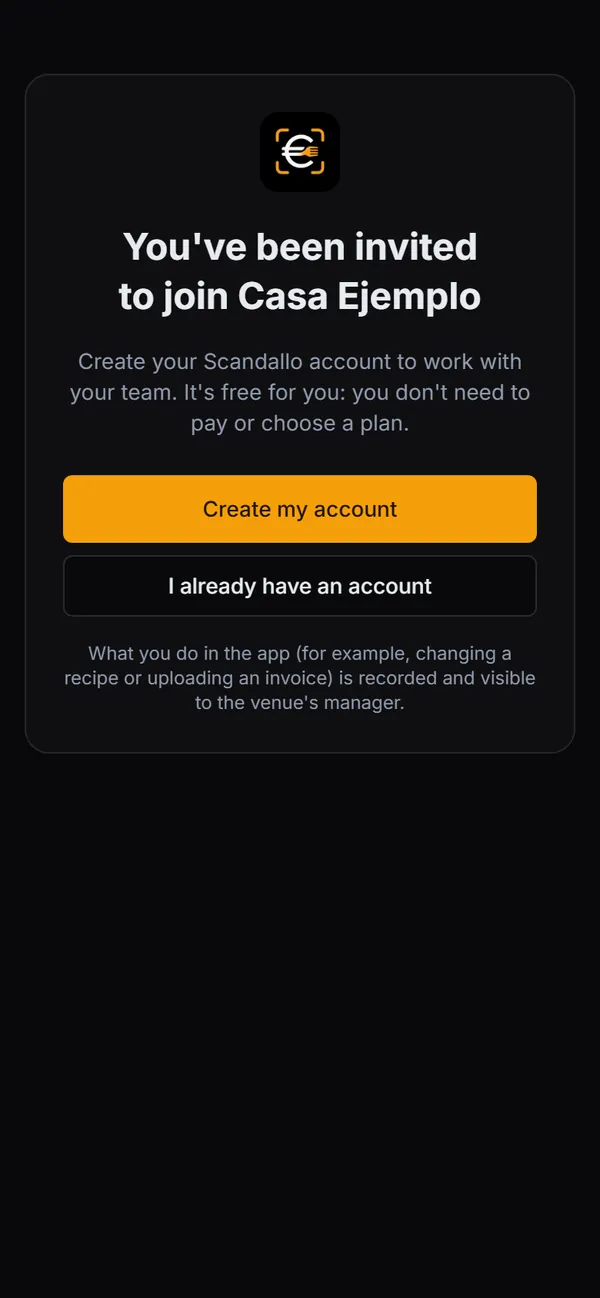
- Send it with WhatsApp, Copy link or Share. Each link is for one person only, expires in 7 days and, for security, is only shown once. Until someone uses it, it appears under “Unused links”, where you can Revoke it.
- When they open it, the person creates their account (or logs in with the one they already have), enters their name and job title and taps Request to join. It's free for them: they aren't offered any plan.
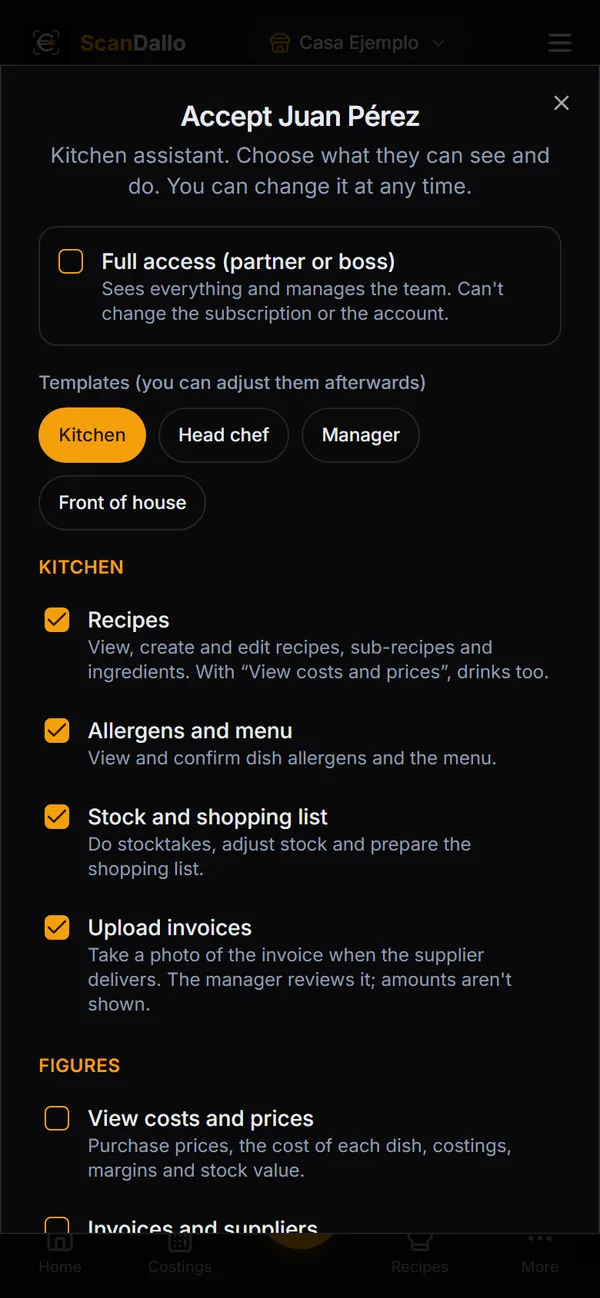
- You get their request: you see it on Home and in Team, under “Requests to join”. Tap Accept, choose what they'll be able to see and do, and confirm with Add to the team (or tap Decline).
From then on, when that person opens the app, they see your venue on their welcome screen. If they already had their own business on Scandallo, they see both and choose which one they're working at.
2. Decide what each person sees
Rather than going permission by permission, start with a template and then change whatever you like:
- Kitchen: recipes, allergens, stock and uploading invoices, without seeing any figures.
- Head chef: everything in Kitchen, plus dish costs, invoices and suppliers.
- Manager: everything in Head chef, plus sales and profitability.
- Front of house: allergens and the menu only, to answer customers' questions.
Permissions come in two groups. Kitchen: Recipes, Allergens and menu, Stock and shopping list, and Upload invoices. Figures: View costs and prices, Invoices and suppliers, Sales, Profitability and savings, and Costs & staff (which includes wages). Anyone without “View costs and prices” doesn't see any prices: not in recipes, ingredients or stock.
Under Default permissions you choose the ones suggested when you accept someone (to begin with, Kitchen's). Tap someone on your team to change their name, job title and permissions, pause them (they can't get in until you restore their access) or remove them from the team.
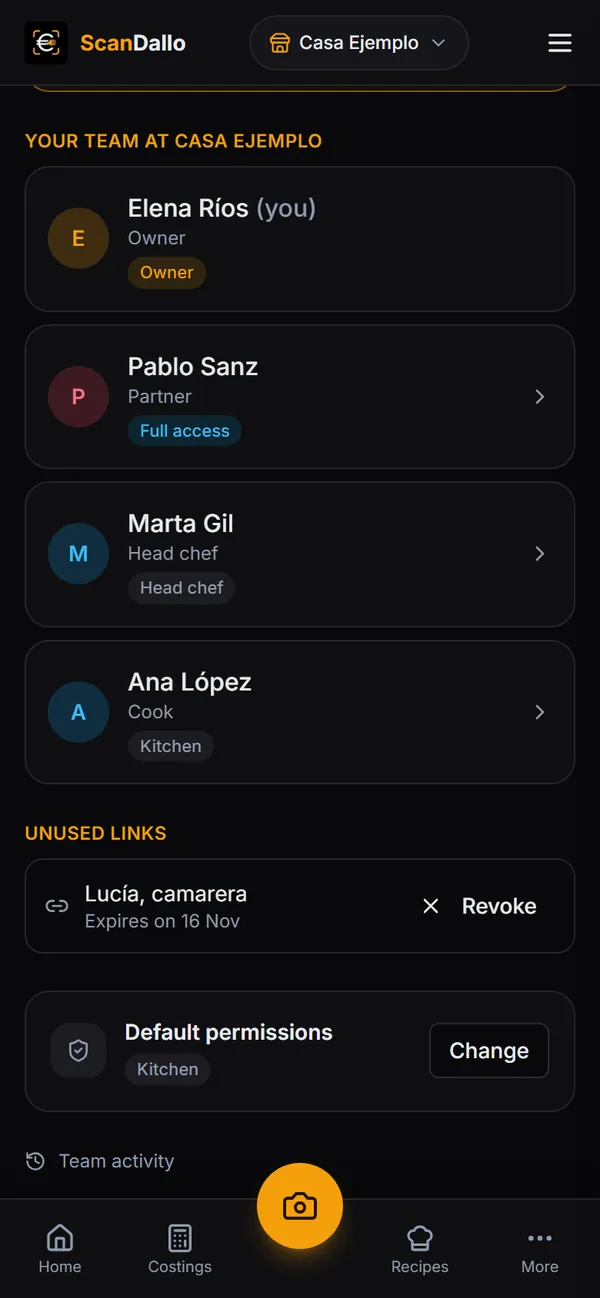
3. What your team sees
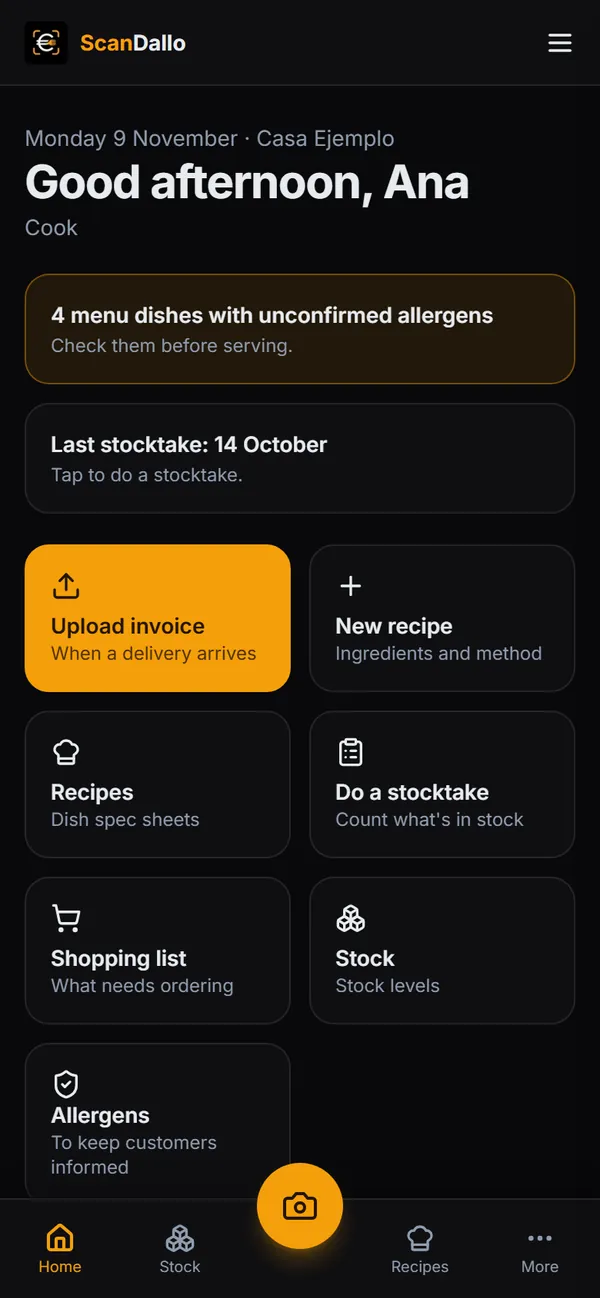
Each person has their own Home, with only what they can do: upload an invoice, create or edit recipes, do a stocktake, the shopping list, stock or allergens. If they don't have figures permissions, they don't see sales, margins, costs or wages on any screen. In Settings they see their own details and, if they stop working with you, they can leave your team with Leave, next to your venue.
Invoices when an order arrives: anyone with the “Upload invoices” permission (but not “Invoices and suppliers”) takes the photo from Upload invoice and can leave you a note. They don't see amounts, the AI doesn't read it and it doesn't use any scans. It shows up for you on Home and in Invoices, under “To review”: tap Review and scan it like any other invoice.
4. Team activity
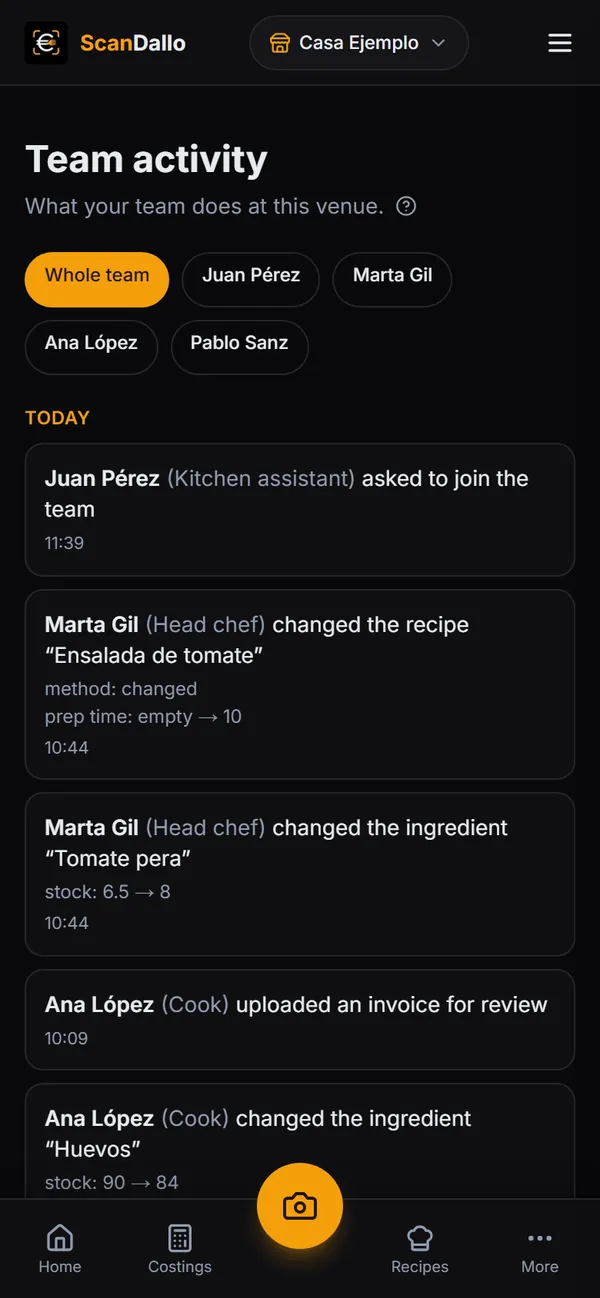
In More → Team activity you see what each person on your team does at that venue: who created or changed a recipe (and what changed, before and after), who adjusted the stock, uploaded an invoice or asked to join, and when. You can see the whole team or filter by person. What you do yourself, as the owner, isn't logged.
- Only the owner and partners can see it.
- It's kept for 12 months.
- Each venue has its own team: to work at another venue you need an invite from that venue.
Chapter 15
Your account, your data and plans
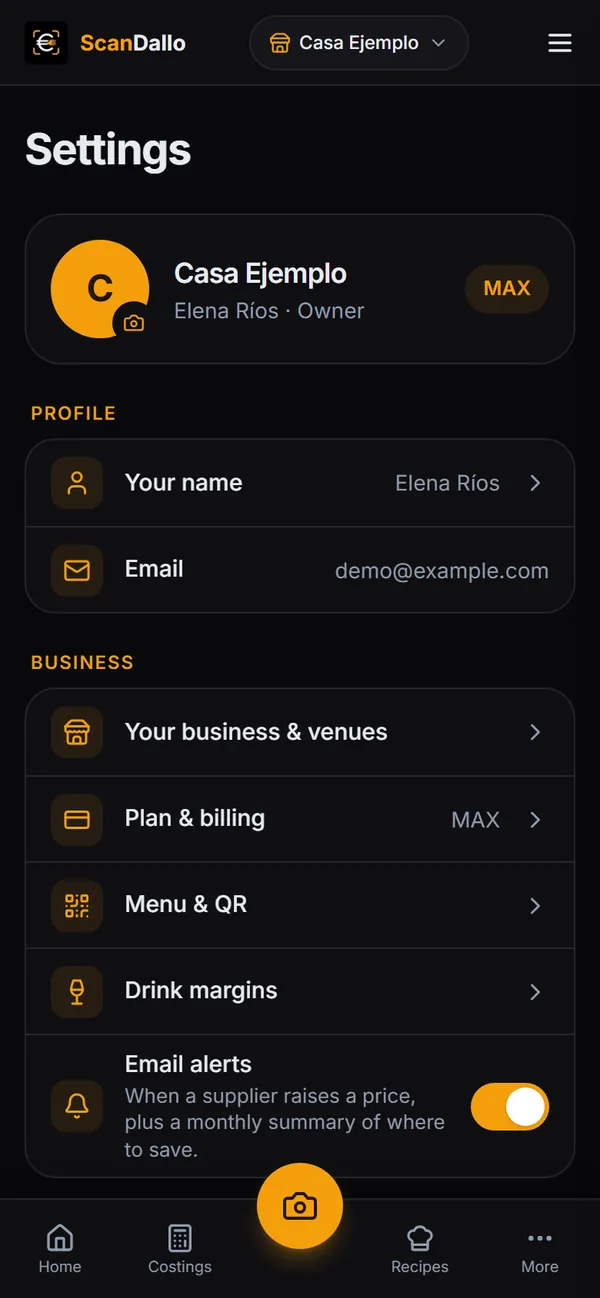
Everything to do with your account is in Settings, in a single list: Profile, Business, Preferences, Help and Account.
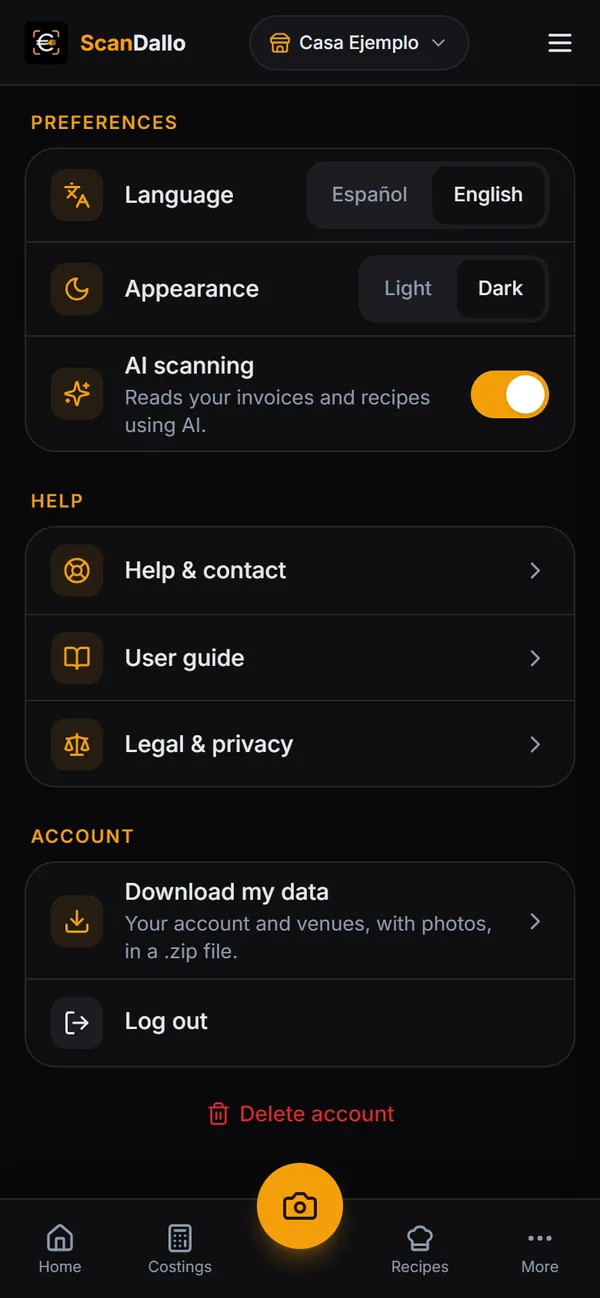
What's in Settings
- Profile: your name (tap it to change it), your email and, if you work at someone else's venue, that venue with your job title and Leave.
- Business: Your business & venues (the photo, the name and your venues), Plan & billing, Menu & QR, Drink margins and the email alerts.
- Preferences: the app's language (English or Spanish), light or dark mode, AI scanning of invoices and recipes (you can turn it off) and, on a computer, replaying the tutorial.
- Help: Help & contact, where you can send us a question or a problem and, if you like, leave your phone number so we can call you; you can also leave a star rating and review there, which appears on scandallo.com/en/reviews. Plus the guide and the legal texts.
- Account: download your data, log out and, at the very bottom, delete your account.
- People on your team don't see the Business group.
Several restaurants in one account
You can have several venues in the same account Varies by plan. Each venue has its own recipes, invoices, stock and sales, and you switch between them with one tap. You can copy recipes (several at once with Copy to another venue; any missing ingredients come across with their latest price, as provisional) and suppliers to another venue, and share an invoice with your other venues without scanning it again. To delete a venue you no longer use, go to Settings → Your business & venues, tap it and tap Delete venue (you can download your data first); the venue that pays the subscription can't be deleted.
Plans and billing
You start on the Free plan, no card needed. The paid plans (monthly or annual) mainly change how many invoices you can scan a month, how many costings you can have, how many venues and how many people on your team, plus some features marked “Varies by plan” in this guide. Only the account owner chooses a plan and pays. You pay by card without leaving the app, through a secure payment gateway, and in Settings → Plan & billing → Manage subscription or change plan you can change your plan or your card. To cancel, use Cancel my subscription: it asks you why (optional and anonymous) and you keep your plan until the end of the period you've paid for; after that you move to the Free plan and your data isn't deleted.
Current prices and what each plan includes are at scandallo.com/en/pricing.
Your data is yours
- Download my data (GDPR): downloads all the data from your account and all your venues (suppliers, ingredients, invoices, recipes, payments…) and your photos, in a .zip file. It's a technical file, designed so you can take your data with you.
- Delete account: deletes your account and the data of all your venues. To prevent accidents, it asks you to type your business name. It can't be undone, and if you had a paid subscription it's cancelled automatically. If you work on another venue's team, deleting your account doesn't touch that venue's data.
Chapter 16
Words worth knowing
- Costing
- Working out what a dish or a drink costs you to make, ingredient by ingredient. In Spanish, escandallo.
- Net quantity
- What goes into the dish, already trimmed and ready.
- Waste
- What's lost when trimming or cooking, as a %. At 20%, you buy 1.25 kg to get 1 kg trimmed.
- Cost per portion
- What each portion (or each glass) costs you, including ingredients and extra costs.
- Food cost
- The share of the selling price, excluding VAT, that goes on cost.
- Target food cost
- The food cost you don't want to go over. For dishes it's set at 30%; for drinks, it depends on the type (Drink margins).
- Suggested menu price
- The price, including VAT, that meets your target food cost.
- Actual selling price
- The price you sell the dish at today. With it, the app can tell whether a dish is losing money.
- Margin
- What's left of the selling price after paying the cost.
- Recipe
- Each dish or preparation you write up in the app, with its ingredients and quantities: your recipe book. What it costs is its costing.
- Sub-recipe
- A preparation (sauce, dough, stock) that you use in other dishes. Its “total yield” is how much it makes.
- Prime cost
- Food cost plus staff cost, as a share of sales. The benchmark is below 60%.
- Break-even point
- What you need to sell each month to cover your fixed costs and your staff.
- Scan
- Each AI reading of an invoice or a recipe.
- Linking an ingredient
- Connecting an ingredient typed by hand to one of your products that has a price.
- Account owner
- Whoever created the account. They're the only one who can choose the plan, appoint partners or delete the account.
- Partner
- Someone on your team with full access: they see everything and can manage the team.
Chapter 17
Frequently asked questions
Do I need to install anything?
No. You use it in the browser on your phone, tablet or computer. If you like, you can add it to your phone's home screen.
Does it work offline?
No. It needs a connection to open and to save.
Can the AI make mistakes?
Yes. That's why the app always shows you what it has read and you check it before saving. If a photo is poor, it tells you.
Can I add invoices without scanning them?
Yes: XML e-invoices (Facturae) are read without AI and don't use scans. And you can set the price of any ingredient by hand.
Does it connect to my till?
Not automatically. You export the sales by item report from your till and upload it in Sales.
Can I run several restaurants?
Yes, several venues in the same account, depending on your plan.
Can my cooks use it without seeing my figures?
Yes, depending on your plan: invite them from More → Team. Each of them logs in with their own account and only sees what you allow. It's free for them.
How much does it cost?
There's a Free plan, with no card needed, and paid plans billed monthly or annually. Current prices are at scandallo.com/en/pricing.
Can I cancel whenever I like?
Yes, from your subscription settings. And if you delete your account, the subscription is cancelled automatically.
Where is my data?
The database is in the European Union. Some services we use (AI reading, for example) are outside the European Economic Area, with the safeguards explained in our Privacy policy.
Who sees my figures?
Each business's data is kept separate from everyone else's: in the app, only you and the people on your team you give permission to can see it. Your customers only see your public menu, if you turn it on.
What if I need help?
In More → Help & contact (also in Settings → Help & contact) you can send us a message and leave your phone number. You can also email us at admin@scandallo.com.
Want to try it with your own invoices?
Start on the Free plan, no card needed. Upload an invoice, create your first costing and see what your signature dish really costs you.